I started reenacting in 2000. Over the last 20 years, there were many times that I needed something machine sewn- either uniform insignia such as collar Litzen or Tresse, which were usually machine applied, or repairs to my uniforms and gear. I paid other people to work on my gear, or would beg friends with sewing machines to help me out. For 20 years, I had no idea how easy it would have been to have my own, very usable, very beautiful, period correct sewing machine. With the money I spent having things sewn for me, I could have bought my own sewing machine several times over!
I am no expert on antique sewing machines. In 2019, I attended a reenactment event in Ohio, and saw a vendor in the parking lot there sewing uniform insignia with an old foot-powered treadle sewing machine. I was impressed at how he easily performed simple repairs and other jobs with this old Singer. He showed me how he kept the machine oiled and told me that it worked great. I resolved to get my own antique sewing machine.
This began a learning period that lasted for a long time for me. I quickly assembled a collection of useless machines. There was a Singer, rusted solid, and a 19th century machine by another brand, with a “vibrating shuttle” bobbin case that was like something on an old loom, and that I never could adjust right. At one point I basically gave up, concluding (erroneously) that getting a working antique machine would be a challenge, that these things were not as easy to use as I had thought.
This finally changed in the fall of 2020 when a friend gave me a 1940s Singer 66 machine, that he found in the trash. It was a motorized unit, though the old wiring was brittle and not safe to use. I replaced all the wires, learned how to thread and use the machine, and in a matter of hours I was finally doing my own sewing! It was just as easy as the guy who inspired me had showed me that it was. I have since restored several other machines that I found locally for cheap, and gotten them working perfectly. In this article I will explain my process and give you tips on getting your own period correct sewing machine that you can use.
If you want an antique sewing machine, I recommend the Singer 66. This is a heavy duty machine that can stitch through many layers of heavy canvas or denim, and even some leathers. It uses a Type 66 bobbin, and 15×1 needles, both of which are still produced, and can be bought at any sewing store or even at Wal-Mart. These machines were made for about 60 years, and over a million were made. They were made in factories in different parts of the world- by the 1930s, Singer could boast that you could buy a sewing machine at a Singer Sewing Center in “any city in the world,” and that probably was not much of an exaggeration. They were certainly made in Germany as well. The Singer 66 is a straight stitch only machine, though there were attachments that allowed it to sew buttonholes and to do zig-zag stitching. When they are adjusted right, they make a beautiful, straight stitch. Many parts for them are still produced and are available online, and the mechanism is very simple; they are easy to work on and to maintain.
Where can you get a Singer 66? Because these things were made in such quantity over such a long period, they are easy to find, and generally not expensive. In my area, it is not at all hard to find an old treadle head for $25 on Facebook Marketplace. I have seen them in the original treadle cabinets sell for $50 and even less. A nearly pristine century-old example in an ornate cabinet, which might have cost the equivalent of what a new car costs in today’s money when it was new, might sell for as little as $100. Usually the sellers don’t know what they have, other than that it is an antique Singer sewing machine. You can find out what model an old Singer is by looking up the serial number. In most cases, the serial number will tell you when and where any old Singer was made, and what model it is. On a Singer 66 from before around 1950, that serial number is on the front of the base of the machine, in front of the column that supports the upper part. You can look these numbers up on this web site, or you can even get an app for your phone, called Singer Serial DB, that allows you to just enter the serial number and immediately identify the model and year of manufacture.
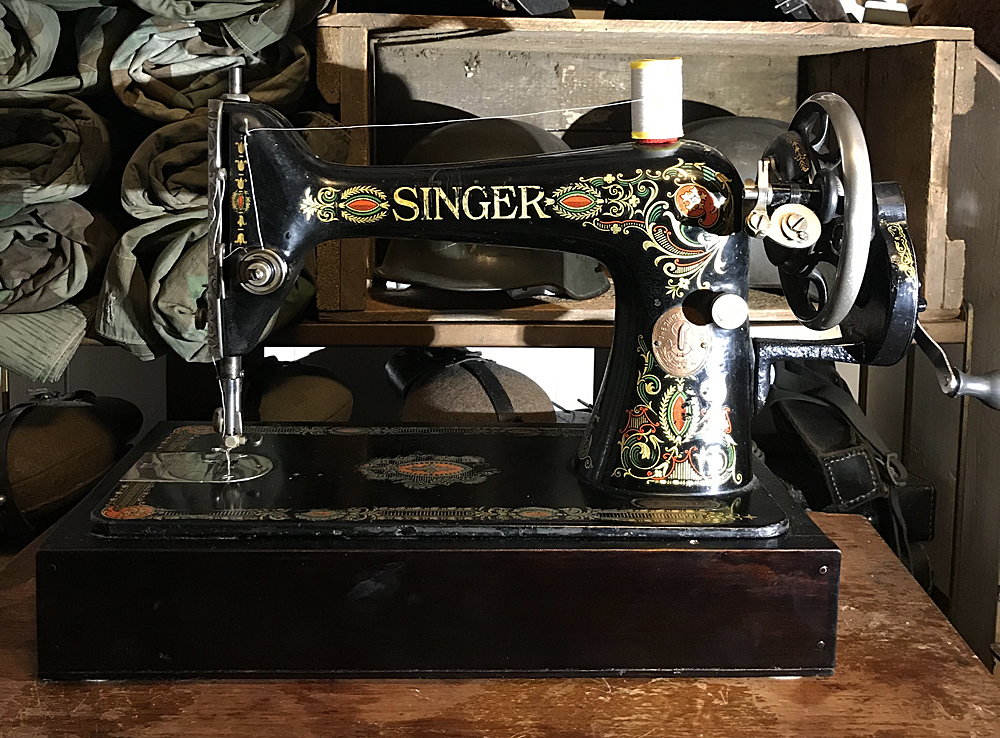
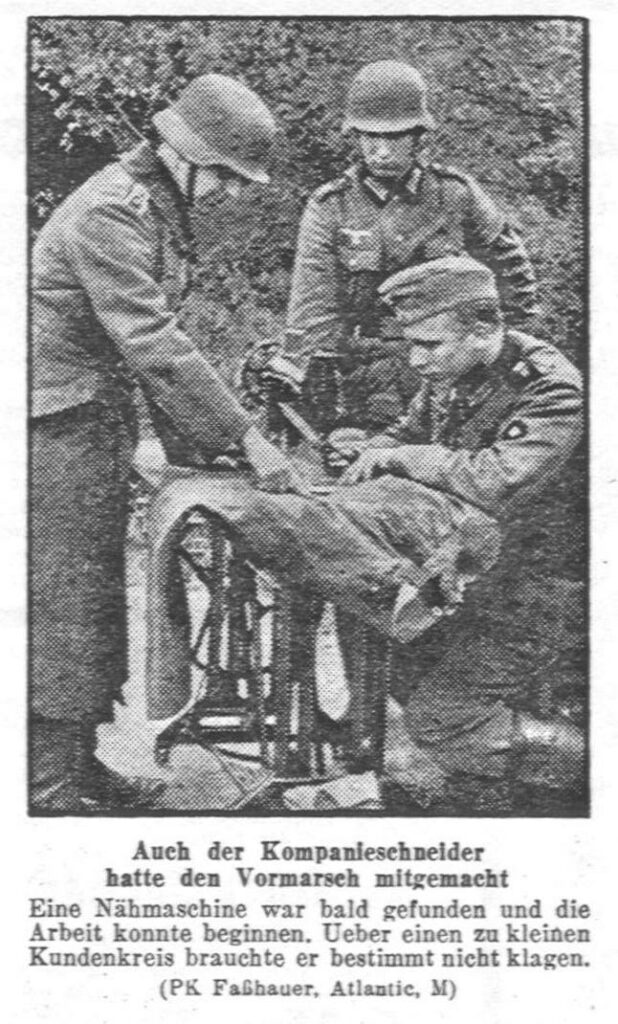
The decals on these machines are a clue to the model and manufacture period, too, and they are a consideration if you want to use this for reenacting. The photo at the start of this article shows a Singer 66 with the “Red Eye” decals. These decals were only used on Singer 66 machines made in the USA from around 1910 through the early 1920s, though not all USA made Singer 66 machines had those decals. If you see those decals, you know you are looking at a 66. It’s called the “Red Eye” because of the red ornamentation on either side of the “Singer” name, which looks like an eye. German made Singer 66 machines from that period seem to have mostly used the decal set known as “Lotus” or “Thistle” decals. These were used in the USA, too, until around 1910; most of the USA made “Lotus” decal machines don’t have a boss for mounting a motor or a hand crank (more on that later). Starting in the 1920s and continuing through the start of WWII, many Singer 66 machines used the simple “Filigree” decal set, which was used in Europe as well. I think the “Red Eye” decals are beautiful, but if you want to use a machine at reenactments you might want to choose one with decals that were also used on European built Singer machines, though of course there is no reason why a machine made in the USA, maybe before WWI, couldn’t have found its way to Europe, somehow. Wehrmacht field tailors did make use of machines they found somewhere; here is one such example, from the magazine “Uniformenmarkt,” August 1 1940. The caption reads: “Even the Kompanie tailor has taken part in the advance. A sewing machine is quickly found, and work can begin. He certainly has no need to complain about a shortage of customers.”
The Singer 66 was sold as a treadle head (in a special table with a large wheel and foot lever), as an electric machine with a light and motor, and also as a hand crank machine. Hand crank variants are more common in Europe than in the USA, where treadle machines seem to have been predominant. I have restored two motorized machines, two treadle machines, and have converted two machines to a hand crank, using inexpensive modern production components. I have used these machines to do typical reenacting tasks: repairing holes in Zeltbahn shelter quarters, repairing damages to uniforms, and applying insignia. For these tasks, personally, I have found the hand crank machines to be ideal. They have many advantages:
- They are always ready to go
- No need for electricity
- They offer the maximum level of precision and control, ideal for small tasks
- They are very easy to use for a beginner, as you can go as fast or slow as you want
If you live in the USA, you might find it hard to get an original hand crank machine; they aren’t common. An original hand crank- just the crank- is a sought after part, worth quite a bit more than an average common sewing machine from the same era. Fortunately, the cranks are still in production, and new cranks can be bought on eBay and Amazon, and elsewhere online, for under $20. The new made hand cranks aren’t totally period correct- they have a black plastic handle, and Philips head screws- but they will get you sewing, and you can always upgrade to an original crank later, if you can find one. The crank is geared, so every turn of the crank results in 3 oscillations of the mechanism in the machine. They work well, and allow for fast sewing if you need that. The crank attaches to a boss on the body of the machine, with a single screw. It’s super easy to install and use.
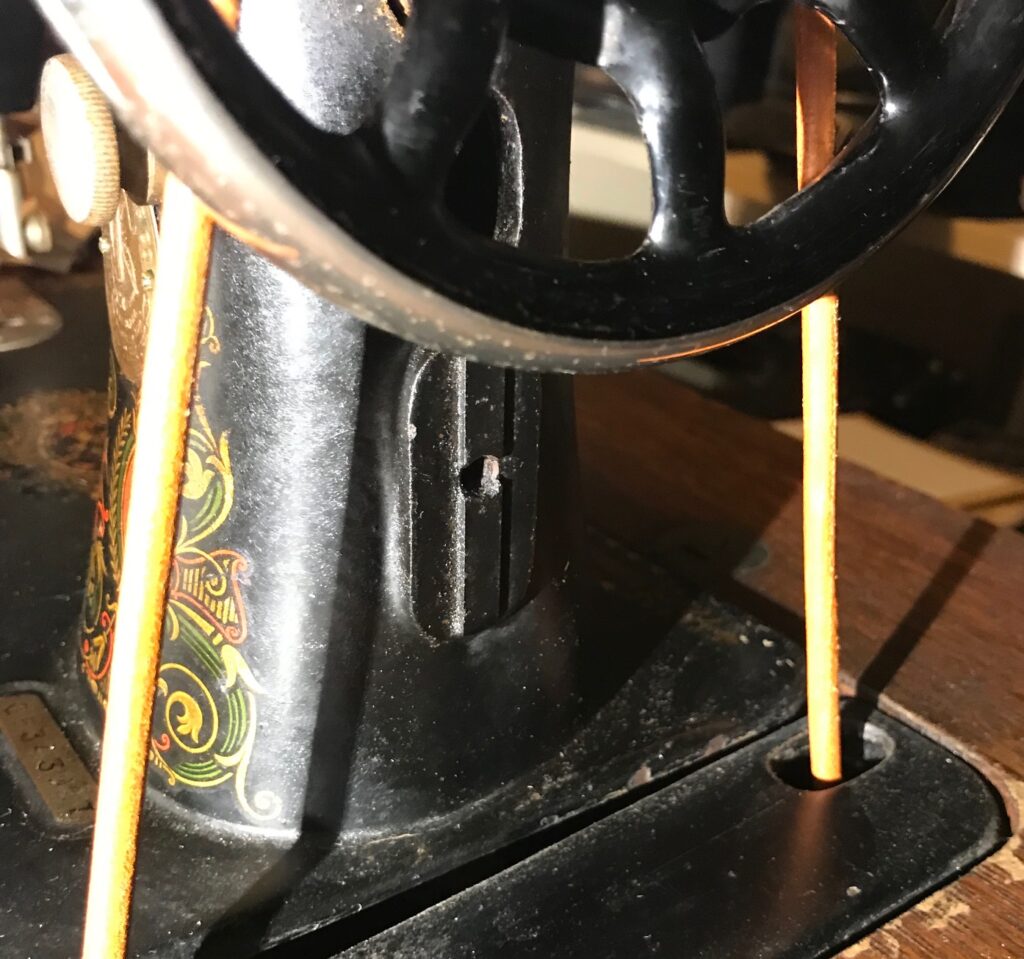
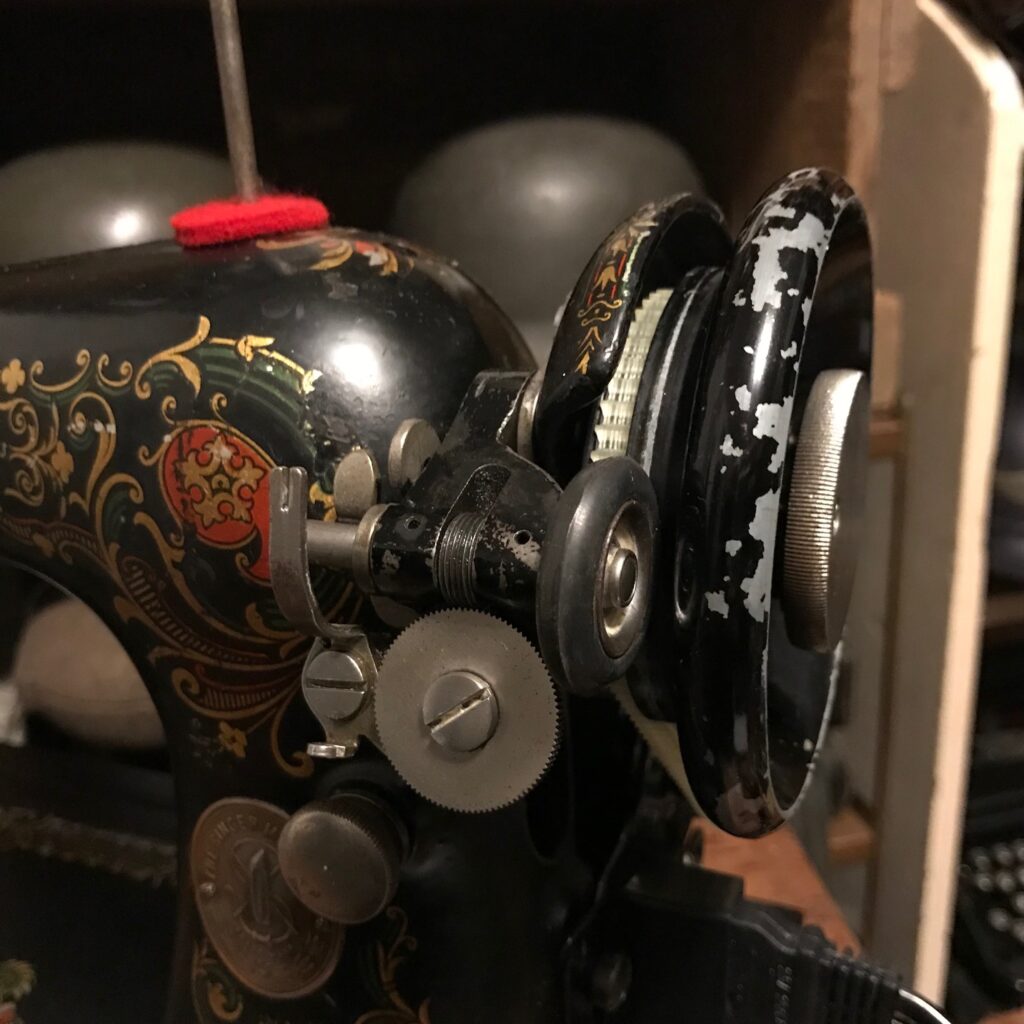
But: not every Singer 66 will work with this current production, original style hand crank. You need to find a machine with a spoked hand wheel, rather than a solid wheel. You also need to have a machine with a boss for the motor. The first Singer 66 machines to be produced could only be used with a treadle table (there is a workaround I will mention later). Some time around 1910, they started adding a fitting (the boss) that you would use for a hand crank. Here is a photo of what I am talking about. It’s the raised area on the back of the column below the hand wheel, with the threaded hole at the center.
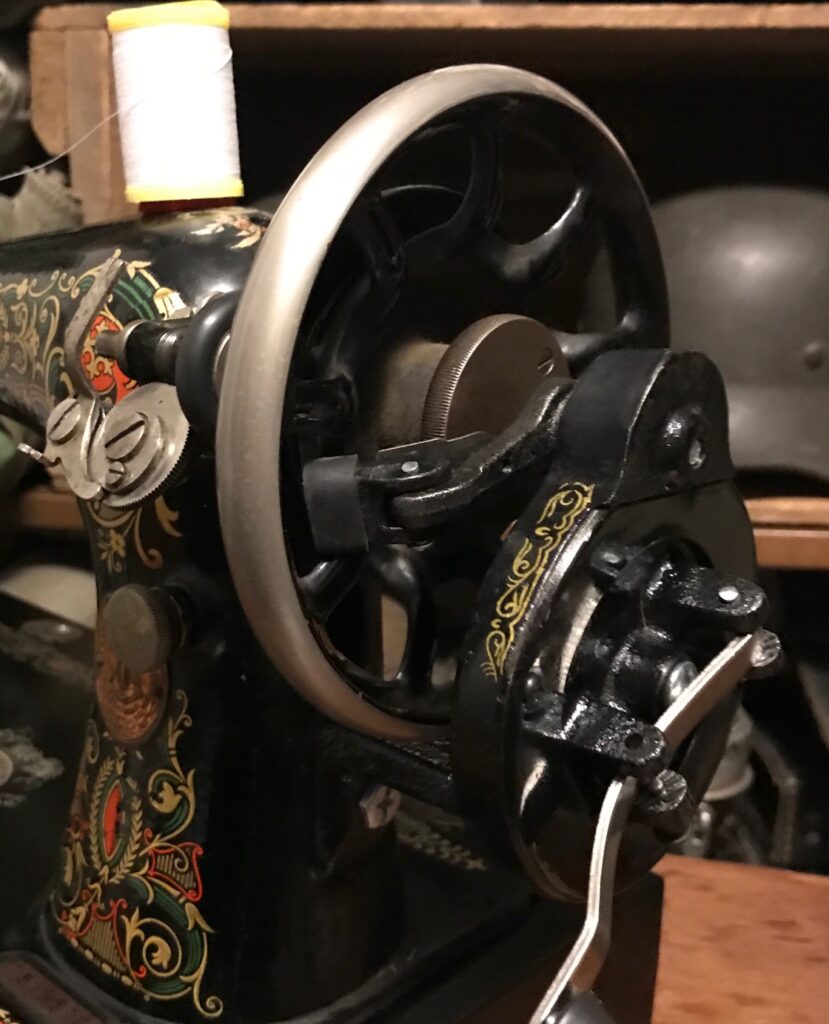
You also need a spoked hand wheel like this. There is a “finger” on the hand crank that fits in a space between two spokes, that drives the mechanism. This photo shows the spoked wheel with the hand crank installed.
For comparison, here is one version of the solid wheel. There was also a solid wheel with a chrome or nickel plated outer rim.
When you get the current production hand crank, it will be marked “Made in China” with a decal or a sticker. The sticker is easy to peel off; I rubbed the decal type off with acetone and some steel wool.
Modern reproduction spoked hand wheels are available, and not expensive. But if you convert a solid wheel machine to have a spoked wheel, you will lose the use the bobbin winder, the mechanism that loads thread onto the bobbin. The bobbin winders, themselves, are identical on most machines regardless of the wheel style, but there is a cast fitting that mounts to the frame just in front of the wheel, that the bobbin winder mounts to, and that part is different, with the mounting holes in a different place depending on the type of wheel. You can find some other way to put thread on the bobbin if you have to- some people just use another sewing machine. But if you are just going to have one machine, and you want it to be a hand crank, ideally, you want it to be one that was made with a spoked wheel. They are common and not at all hard to find.
Can you use any hand crank with a machine with no motor boss, or with a solid wheel machine? There is a type of crank available on eBay that will mount directly to the back of the wheel. Unlike the original style geared crank, which turns the mechanism three times per crank, this more simple device will turn the mechanism one time with each turn, so it limits your speed. For small repairs and applying insignia, that might be ample for your needs. For solid wheel machines that have a motor boss, you could also install a new production motor, instead of a crank. The motor comes complete with a foot pedal; they aren’t expensive, and can readily be found for under $30.
There are a couple more factors to consider on these as well. Because there are moving parts on the underside of the machine, it can’t be operated just sitting on a flat surface. It needs to be either in a table, like a treadle table, or it needs to have a base. The base can be as simple as a sort of wooden tray that the machine sits on. There are plans for bases for the Singer 66 online, and there are sellers on eBay and Etsy, who offer them. I make my own bases. Four boards a few inches tall, cut to the right length, and nailed together, will do the job.
Also, there is the matter of back tacking. Back tacking is when a machine sews in reverse, to add some stitches to prevent thread from unraveling. Late production 66 machines have this reverse capability. Most did not. There are many techniques you can use to finish a line of stitching so it won’t unravel, without having a back tacking capability. The later production machines also have an improved thread tensioner, with a numbered dial. This numbered dial tensioner is easier to use than the earlier type, but a little trickier to disassemble. Personally, I prefer the earlier machines. The simpler, the better.
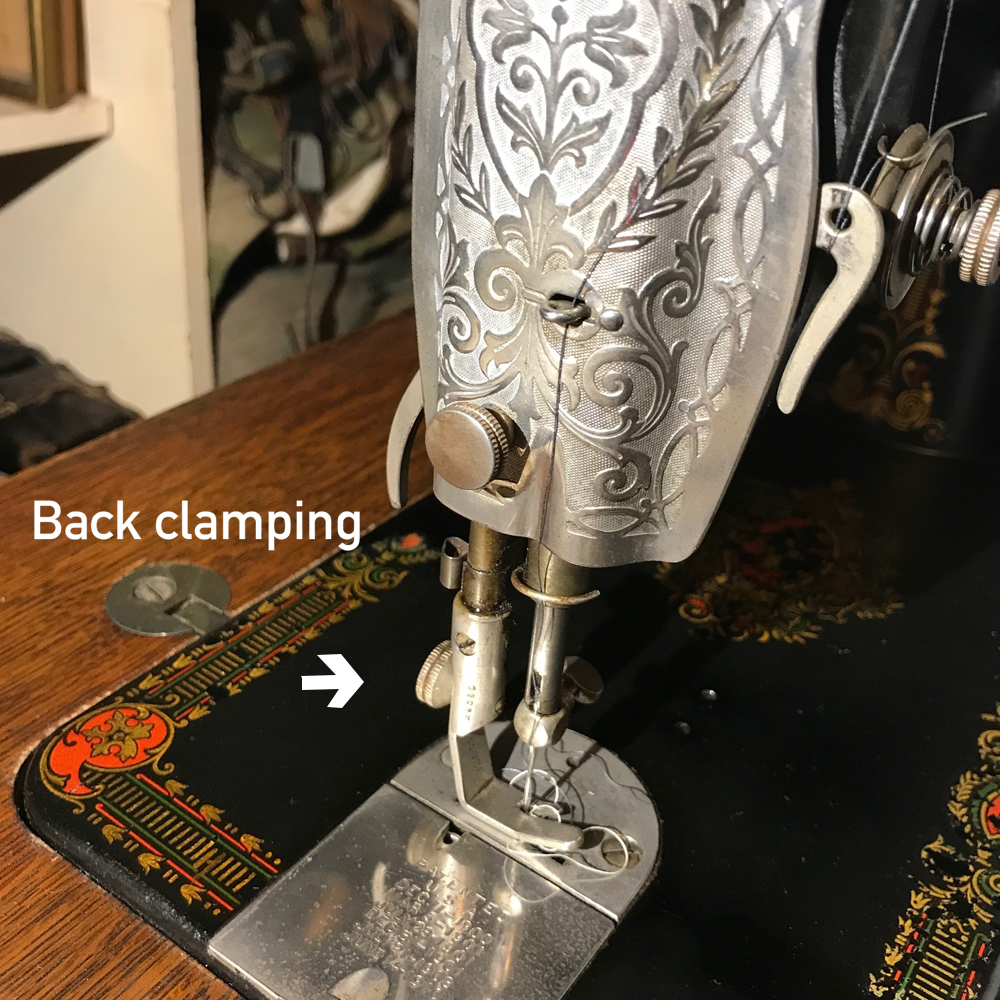
The last consideration is the two styles of presser foot, “back clamping” and “side clamping.” The presser foot is a spring-loaded foot that holds the fabric in place when sewing, close to the needle. On early Singer 66 sewing machines, they used a back clamping foot style. Here is a photo of it. You will see that the knurled thumb knob used to secure the presser foot to the presser foot bar, is on the back of the machine.
Later on, Singer switched to a side clamping presser bar for this model. Note that the knurled thumb screw here faces in the same direction as the shiny plated nose plate on the machine.
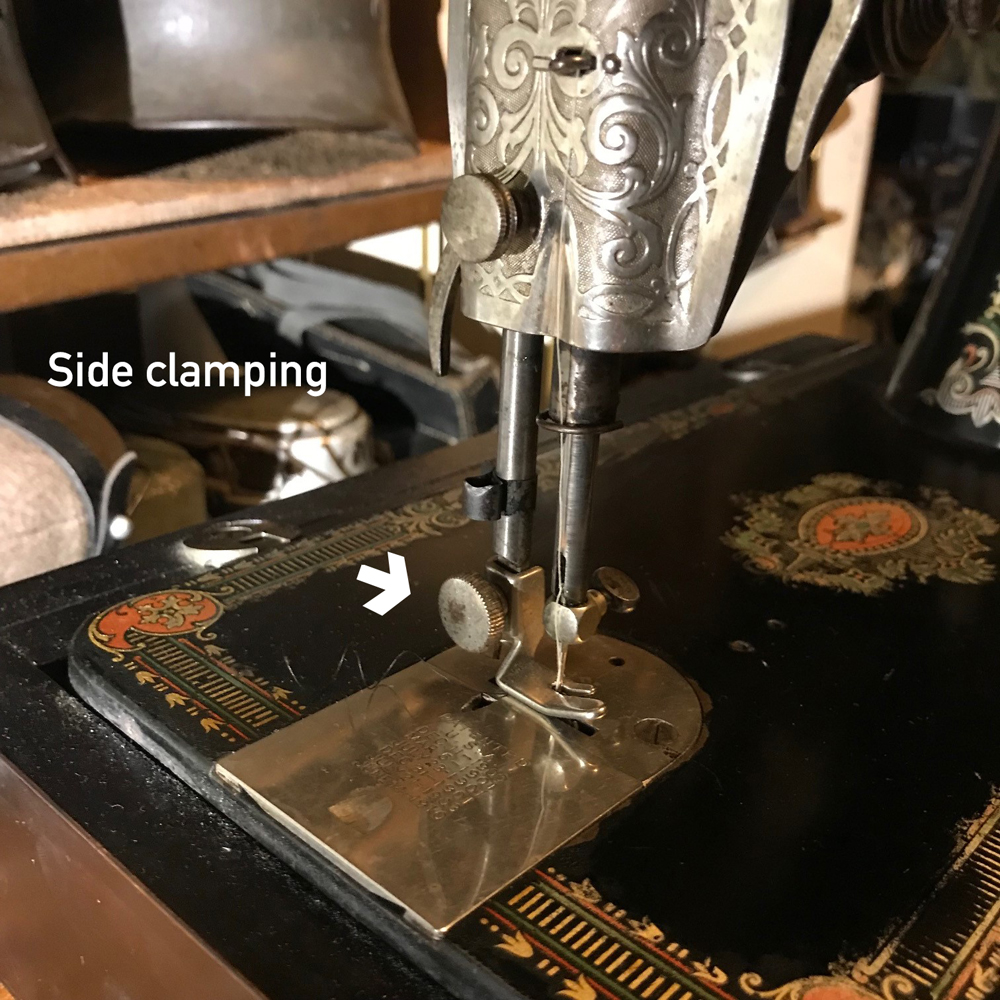
Both of these photos show regular, standard, straight stitching presser feet installed. If you are only ever going to do basic straight stitching, and assuming that your machine comes with a presser foot installed, it doesn’t matter if your machine is a back clamping or side clamping type. But if you ever want to use different types of presser feet, such as feet for hemming, or if you want to use zig-zag or buttonholer attachments, you will want to get a side clamping machine. These machines are not rare or hard to find. Special presser feet for back clamping machines can be hard to find, and attachments may not exist. Feet for side clamping machines are still made, and vintage attachments are common.
When you are looking at a machine, how can you tell if it works? Turn the hand wheel towards you. The needle should move up and down. If it doesn’t, it’s not working. It might be an easy fix, maybe just gummed up by some old lubricant. Or, it could be frozen by rust, and possibly beyond repair. If you are looking to buy your first machine, it is likely best to start with one that moves freely. Look underneath the machine, at the linkages and parts at the bottom. You don’t want to see lots of rust there. Ideally, there should be little or no visible rust on the machine. I have brought one rust bucket back from being totally frozen but this may not always be possible.
Once you have chosen a machine, the process of getting it working is pretty easy. There are plenty of YouTube videos and other tutorials online that go into this process, I will just cover it briefly. The main thing is, you need sewing machine oil- gun oil works for this purpose. Look at the top of the machine, the holes you see are for oil. But a drop or two in each hole. Don’t forget the little hole just in front of the hand wheel. There is a hole in the shiny plate on the base that the needle passes through, put oil there. On the back of the machine there is a round metal plate. Remove that plate, look inside, turn the wheel, watch the parts move. Everywhere where metal touches metal as it moves, add a drop of oil. Take off the nose plate on the front of the machine and do the same thing. Slide off the bobbin cover, look at the moving parts, oil them. Look under the machine, watch the linkages move, oil every joint. These machines were incredibly well engineered and made to last. In most cases they have exceeded the life spans of the people that made and used them. They will still work, it’s astonishing how easy it is to get them sewing right. Mostly they just need oil! Many minor problems these machines can have, can be solved just by cleaning them. Metal parts will sometimes have a hard brown film which is old dried up oil and grime. Acetone will often take that off. Parts with light surface rust can be cleaned with fine (000) or super fine (0000) steel wool, and sewing machine oil. Nickel plated parts like the bobbin cover, needle plate, nose plate, etc. can benefit from cleaning with a metal polish. It’s incredible how easy it can be to make a grimy machine shine almost like new, it just takes a little time cleaning parts. Never use solvents or steel wool on painted parts.
Your new machine might be covered in grime on the outside. Use sewing machine oil and a soft cloth to gently wipe and buff the black paint and decals. In a matter of minutes, you can restore the original shine. Never use alcohol or harsh cleaners on a machine, you will destroy the finish and decals.
You will probably find that your machine will work fine with this basic cleaning. To go a step further, you can remove the needle plate, take out the bobbin case, and get all the accumulated old lint out of there. You can also disassemble the thread tensioner assembly and clean the tension disks. Again, you can check out YouTube for more tips on cleaning. These tasks can easily be done with just a screwdriver, it’s easy.
The bobbin winder has a rubber tire. When it is pressed into position, that tire rubs against the hand wheel and drives the winder. On a lot of old machines, the old rubber tires have hardened or cracked, or have flat spots, and they don’t work. A new bobbin tire costs $2. I buy parts like this from Central Michigan Sewing Supplies. They sell the hand cranks, sewing machine oil, new bobbin covers if yours is missing, they sell needles, bobbins, lint brushes, presser feet, nearly anything you would need.
Once you have the machine clean and ready to go, it’s just a matter of threading it and adjusting the tension. Once again I recommend YouTube for this. You should not have to adjust the bobbin tension.
What about other types of machines? There might be other machines, by Singer and other brands, that are just as heavy duty, just as easy to maintain and use. But I”m not sure there is any machine more common than the 66 and for me, the cheap price, massive availability, ease of use, availability of vintage and new parts, the quality of the stitch and the ability to stitch through heavy fabric and some leather makes the 66 an ideal choice. There is also a 3/4 size version of the 66, which was the Singer 99. It’s lighter and more portable, but it can be harder to move fabric around in the smaller space, and it might be harder to find one with a spoked hand wheel. The prices of the 99 machines tend to be a little higher, too.
A sewing machine is a great asset for a reenactor. It saves time and enables you to make period style alterations and repairs with ease. For less than $100 in total, you can easily get a vintage sewing machine that is every bit the equal of an expensive modern machine, for these basic tasks. Every reenactment group should have someone with this vital piece of equipment.