Match boxes from occupied Ukraine – reproduction label

Here is an original wartime box of matches made by “Monopolverwaltung Reichskommisar Ukraine.” This was a legal monopoly created to give the German state the profits from the sale of matches.

These matches could have been used by soldiers or civilians. They are packaged in a small wooden box covered with purple paper. Two sides of the box have had a coating applied that allows them to be used as a striking surface for the matches.

The label for the matchbox is crudely printed on thin, inferior quality wartime paper. The print quality is terrible.

The simple graphics and shoddy print quality make this label easy to reproduce from a cleaned-up scan.

Here is that original box again, together with a reproduction I made by putting this label and some purple construction paper on a modern match box. The one at the bottom is a reproduction that I made that was used at a reenactment event, where it got wet and dirty.

With some effort it would be possible to craft a small wooden match box that would be an almost exact copy of the original. Here’s a link to a PDF version of the sheet of labels.

Wehrmacht tips for care of footwear, from the “Tornister-Lexikon”

Wehrmacht tips for care of footwear, from the “Tornister-Lexikon”

The “Tornister-Lexikon für den Frontsoldaten” by Gerhard Bönicke was a book filled with handy tips for living in the field. Originally commercially published in 1942, it was re-published by the Wehrmacht and distributed to soldiers in 1943. Here are instructions for how to take care of shoes and boots.

“Shoe care 

Proper care extends the life of shoes and protects against foot pain and blisters. After wearing shoes, either put them on supports or stuff with hay, straw, or newspapers. Never dry wet shoes on the stove or on the oven, this makes the leather hard and brittle, always keep them at least 1 meter from heat sources. Don’t put wet shoes on their soles, rather lay them on their sides or hang them up, so the soles can also dry. Regularly clean shoes inside and out. Clean the outside with a dirt brush and a wooden stick, and after drying, rub shoes and boots with leather fat or a fat-containing shoe cream. Rub in leather fat vigorously. Pay special care to greasing seams. Don’t overdo greasing, too much fat makes leather spongy, water-permeable, and causes cold feet. With marching boots, clean the shaft and upper, add fat (grease) to the lower. If you don’t have leather fat, use cod liver oil or castor oil. Avoid hardening oils (varnish) at all costs, as well as mineral fats and oils (vaseline oil). Regularly rub the insides of shoes and boots with a damp cloth or with a rag with methylated spirits. Always deal with small damages immediately. 
 

Soles in completely dried out condition should be rubbed with varnish or linseed oil, until the soles are saturated. This makes soles durable and waterproof. Replace lost hobnails immediately. Rub moldy footwear with turpentine oil or turpentine oil substitute, or with lukewarm water mixed with soap or “Imi”, this requires subsequent treatment with leather fat or a fat-containing shoe cream, dry well first.

Never apply fat to rubber shoes (fat destroys rubber), instead clean with a soft cloth with cold or lukewarm water (never use hot water!). To dry, hang up an ample distance from oven or stove.

Felt shoes should never be worn in wet snow and must be taken off as soon as they are soaked through, otherwise frost injury to the feet is unavoidable. Scrape and brush off coarse dirt, do not dry wet felt shoes too close to a heat source.”

Clothing care tips from the “Tornister-Lexikon”

Clothing care tips from the “Tornister-Lexikon”

The “Tornister-Lexikon” is a guide filled with tips for living in the field. It was was published by the Wehrmacht in 1943 and was intended to be distributed by soldiers and circulated among them. The “Tornister-Lexikon” contains recipes, first aid instructions, and advice on how to clean and take care of all kinds of uniforms and gear, how to make things like field expedient stoves and lamps and brooms and mattresses, how to make a wool blanket into a sleeping bag, how to make a fishing pole or set up a field darkroom, simple carpentry and building, bushcraft stuff like building a fire and tying knots and repelling pests, and other handy tips.

The following tips for caring for and maintaining clothing items are found in this book.

Care of Clothing

-Clothing that can be boiled should be soaked 12 hours in carbonated water and frequently pressed out, to dissolve soils. Wring it out, and when possible, rinse afterward. 30 minutes before adding wash powder, soften water with soda [sodium carbonate]. Then add wash powder according to the package instructions, and put it on the fire. Bring to a boil, boil for 5 minutes and then simmer another 10 minutes. Let it cool a bit, wash it well, hot, lukewarm, cold rinse, wring it out, hang to dry.

-Iron trousers only after thorough beating and brushing to remove stains. Lie trousers flat (seam on seam) on ironing board or a table covered with a wool blanket, put a clean, moist cloth on top and iron with a hot iron using lots of pressure. To fully cool and dry them, hang them in a tensioner. If you don’t have an iron, lie trousers flat under the bed sheets and sleep on them.

-HBT uniform and bread bag are washed in warm water with washing powder, and not wrung out, rather lie them together and press the water out. Hang to dry after thorough cleaning, After drying, grease the leather parts of the bread bag and polish them.
-Do not hang soaked clothes too close to the oven. Spread them out over a frame or the back of a chair, or hang them on a line, 1.5 meters from a fireplace or open fire, or 1 meter from an oven or radiator, to dry.

-Always make repairs using fabric that matches as closely as possible, same with thread. Secure edges of repairs with pins. Using small stitches and proper thread (yarn, thread, silk thread, cotton thread) sew on and iron.

-Do not wash overcoats, field blouses, jackets or pants, rather thoroughly beat them first from the left side, then from the right side, then brush them out well while laid on a level surface.

-Darning. Do not sew holes together with thread, rather make close together, parallel stitches across the hole using wool or cotton thread (depending on whether you are repairing fabric or wool socks), then go the other direction, weaving style, with closely spaced darning stitches, without causing the edges to bunch up. Always darn small holes immediately.

-Wash knit items in warm water (not hot!) water with soap, rinse in lukewarm water until the water stays clear. Lay on a clean cloth to dry, hang socks.

-Zeltbahnen and impregnated fabrics are not to be washed, rather cleaned dry (brushing and beating).

Sewing on buttons

Remove the remains of previous stitching thread. Sew on buttons with sturdy thread. To achieve the spacing between the fabric and the button when sewing, lay two-hole or four-hose buttons over a thick needle or a match and tighten the stitches over this. At the end, wrap the stitches under the button with thread and knot together.

Replacement of trouser buttons

In place of a missing trouser button, if necessary, a round or oval small piece of hardwood can be used. The holes for stitching can be burned through with a red-hot sewing needle, as if you try to drill them with a drill the thin wood will split.

Clean tunic and overcoat collars by brushing with ammonia solution, then washing with soapy water and rinsing with clear water.

Sicherungs-Tafel

Sicherungs-Tafel

Sicherungs-Tafel
 
Arranged by Werner Kleinow
 
6. Wehrsporttafel
 
The Sicherung protects the entire unit from enemy ground observation and hinders unexpected encounters with the enemy. This second task also falls to the Aufklärung. Aufklärung and Sicherung must therefore work together hand in hand. (see Aufklärungs-Tafel)
 
Marschsicherung
 
A marching detachment provides for its own security by advancing a smaller detachment. Security on the march has the following tasks:
 
1. Protecting the marching unit from surprises
2. In contact with the enemy, giving time and space for expansion and deployment
3. Crushing weak resistance
 
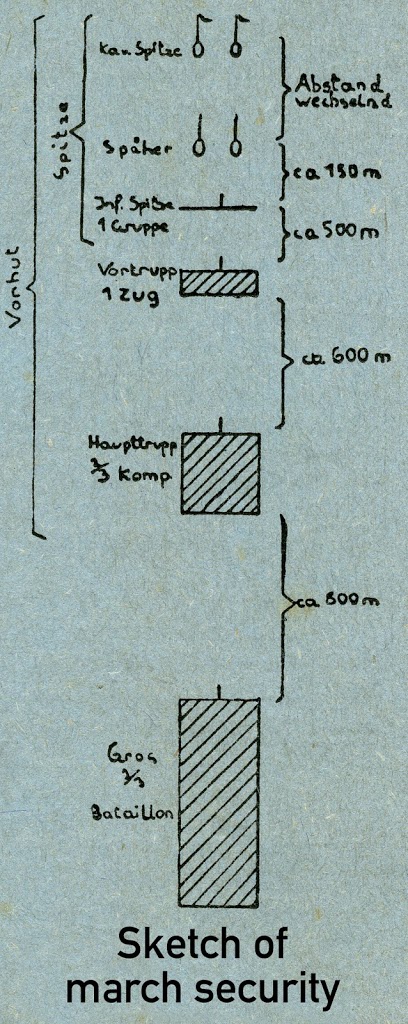
The forward march security of larger units is achieved by the Vorhut. The unit divides itself into the Haupttrupp (main unit), the Vorhut (forward unit), and the Spitze (foremost elements), this is divided into the Infantry Spitze, Späher (reconnaissance troops), and if applicable, the cavalry Spitze.
 
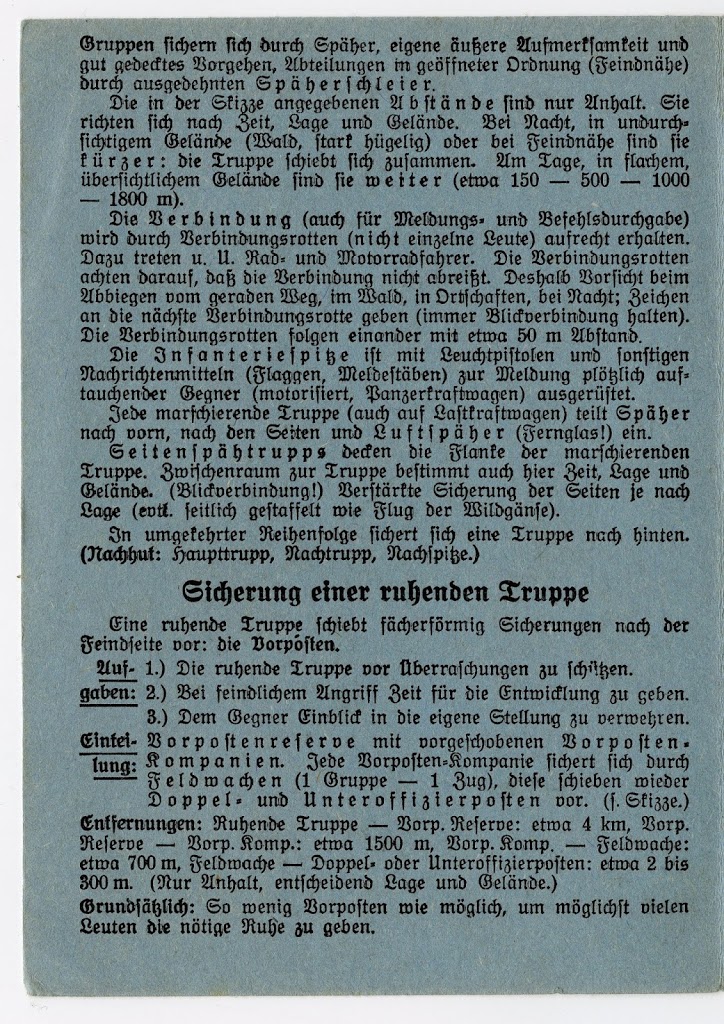
As a rule, one third of the detachment is dedicated to security, meaning that 1 Bataillon on the march sends forward one Kompanie, this Kompanie sends forward one Zug and the Zug sends forward one Gruppe. In front of this Gruppe is situated the Späher (2 men) and the cavalry Spitze. Advancing patrols and Gruppen are secured by Späher, their own external attentiveness and well covered advance. Detachments in open order (contact with the enemy) are secured by an extended network of Späher.
 
 
The distances in the sketch are just an indication. They can vary depending on time, situation and terrain. At night, in terrain with poor visibility (forest, very hilly) or close to the enemy, they will be shorter; units will determine this themselves. During the day, in flat terrain with good visibility, they can be longer (about 150 – 500 – 1000 – 1800 m).
 
Connections between the elements (also for distribution of reports and orders) is correctly achieved by connecting detachments (not individual people). For this are used, circumstances permitting, cyclists and motorcyclists. The connecting detachments make sure that the connections are maintained. They therefore must use caution at bends in straight roads, in woods, in towns, and at night; they must signal to the next connecting detachment (always maintain visual contact). The connecting detachments follow each other at a distance of about 50 meters.
 
The Infantry Spitze is equipped with flare pistols and other signaling equipment (flags, report poles) for reporting suddenly appearing enemy units (motorized and armored units).
 
Every marching unit (also on trucks) sends Späher forwards, to the sides and also for aerial observation (binoculars!).
 
Späher units that are sent to the sides cover the flanks of the marching unit. The distance between the units is determined here also by time, situation and terrain. (Visual contact!) Strengthen the security at the sides depending on the situation (even arranged sideways like a flight of wild geese).
 
In reverse order the troop is protected from the rear. (Nachhut (rear guard): Haupttrupp, Nachtrupp, Nachspitze.)
 
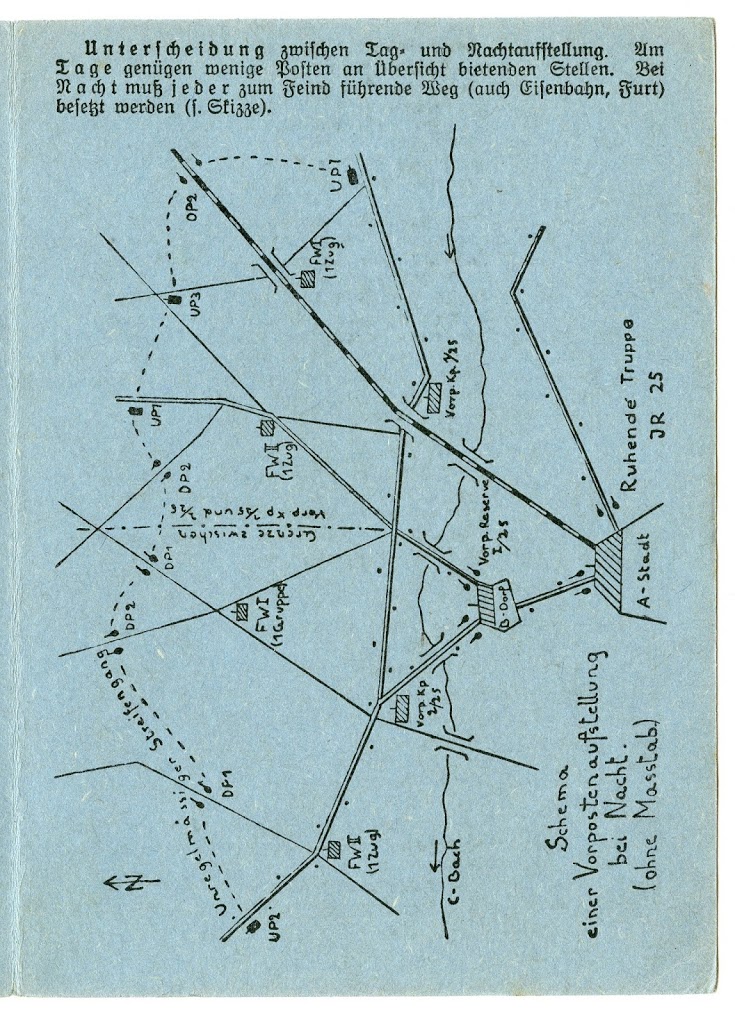
Security of a resting unit
 
A resting unit arranges a fan-shaped security towards the enemy: the Vorposten.
 
Tasks:
1. Protecting the resting unit from surprises
2. In the case of enemy attack, giving time for deployment.
 
Arrangement:
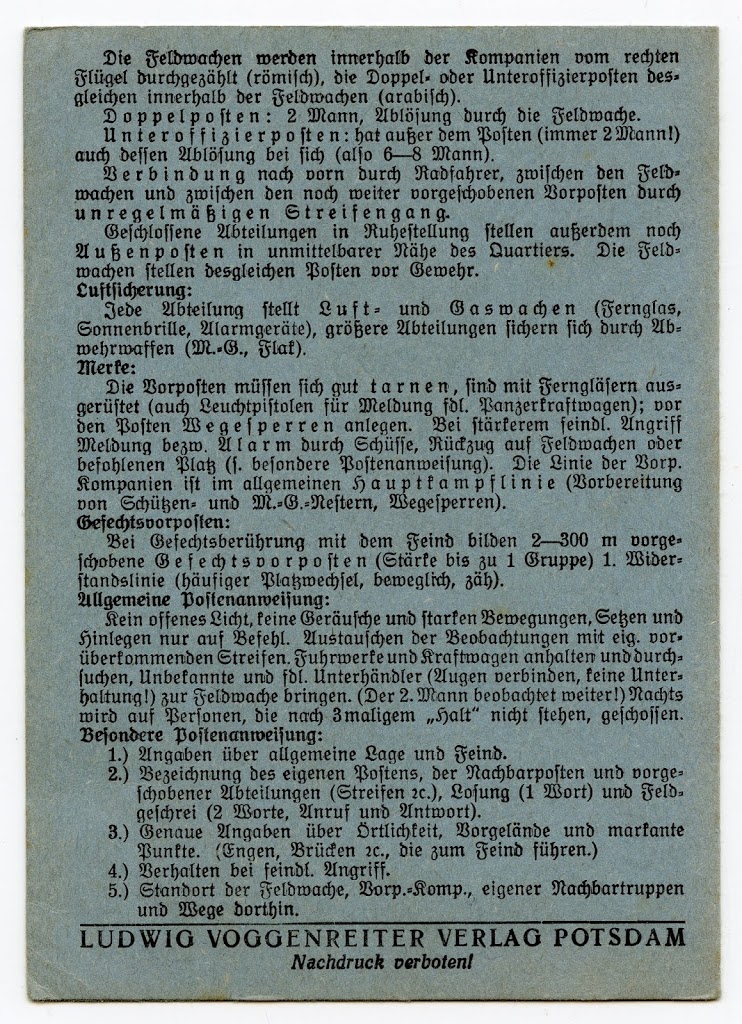
Vorposten reserve with pushed-forward Vorposten Kompanien. Every Vorposten-Kompanie protects itself with Feldwachen (1 Gruppe – 1 Zug), these send forward Doppelposten and Unteroffizierposten (see sketch).


Distances: Resting unit to reserve Vorposten, about 4 km; Vorposten reserve to Vorposten Kompanien about 1500 m; Vorposten Kompanien to Feldwache about 700 m; Feldwache to Doppelposten or Unteroffizierposten, about 200-300 m. (Only an indication, depends on situation and terrain.)
 
As a rule: As few Vorposten as possible, in order to give the maximum number of people the necessary rest.
 
Differences between daytime and nighttime arrangements. In the day it is sufficient to have just enough sentries to observe the positions. At night, every road leading to the enemy (also railways and river fords) must be occupied (see sketch).
 
The Feldposten are numbered within the Kompanien from right to left using Roman numerals. The Doppelposten or Unteroffizierposten are numbered the same way within each Feldwach, in Arabic numerals.
 
Doppelposten: 2 man sentry teams, relieved by the Feldwache.
 
Unteroffizierposten: has in addition to the sentries (always 2 men!) also their own relief with them (6-8 men).
 
Connection forward is maintained by cyclists, connection between the Feldwachen and between the further pushed forward Vorposten is maintained by irregular patrols.
 
Detachments in closed order in rest positions additionally place outposts in the vicinity of their quarters. The Feldwachen similarly position sentries with rifles.
 
Aerial security: Every detachment positions aerial guards and gas guards (binoculars, sunglasses, alarm equipment), larger detachments are protected by defensive weapons (machine guns, anti-aircraft cannons).
 
Notes: The Vorposten must camouflage themselves well, are equipped with binoculars (also flare pistols for reporting enemy armored vehicles); roadblocks are deployed in front of the sentries. In case of strong enemy attack, report or alarm by shooting, retreat from the Feldwachen or ordered positions (see special sentry instructions). The line of the Vorposten-Kompanien is in general the main battle line (preparation of rifle and MG positions, roadblocks).
 
Battle Vorposten (Gefechtsvorposten): In contact with the enemy Gefechtsvorposten pushed forward 2-300 m (strength up to 1 Gruppe) make up the first line of resistance (frequent change of positions, mobile, tough).
 
General Sentry Instructions: No open light, no sounds or strong movements, sitting and laying down only when ordered. Exchange observations with friendly passing patrols. Wagons and vehicles are to be stopped and searched, unknown persons and enemy negotiators (blindfolded, no conversation!) are brought to the Feldwache. (The second man continues to observe!) At night, any person who does not stop after being ordered “Halt!” 3 times is to be shot.
 
Special Sentry Instructions:
1. Furnish information about the general situation and enemy.
2. Designation of their own sentries, the neighboring sentries and pushed forward detachments (patrols, etc.) password (1 word) and field password ( 2 words, call and response).
3. Exact information about the area, the terrain ahead and landmarks. (Passes, bridges etc. leading to the enemy).
4. Stopping of enemy attacks.
5. Location of the Feldwache, Vorposten-Komanien, the neighboring friendly units and the routes there.
 
[Below: the complete original text of the Sicherungs-Tafel, in its original format. For more detail on this subject from a military manual refer to The Gruppe as Feldwach.]


Dienstplan – Daily duty plan for Wehrmacht training

The Dienstplan was the daily duty plan. It would change each day, though some parts likely remained more or less constant. Here is an original example. Every German soldier would have been familiar with a schedule like this from his training time.


6:00 Waking
6:20-6:50 Cleaning duty
7:00 Get coffee
7:30-7:50 Early physical exercise
8:00-8:50 Marksmanship practice in stations
9:00-9:50 Instruction in transport matters
10:00-11:00 Formal training
12:00 Distribution of food
14:00-14:50 Hand grenade throwing, distance and accuracy
15:00-15:50 Games and sport
16:00-16:50 Maintenance of [uniform and equipment] items
17:00 Issuance of orders
17:10 Beginning of the evening meal
22:00 Zapfenstreich [curfew]

Archive document: Waffenfarbe color and shoulder board insignia for all German Army units, 1944

The German military uses insignia piped in different colors (known as Waffenfarbe) to distinguish different service branches. In WWII, the Wehrmacht used shoulder board insignia as the only distinguishing unit insignia for most units. This original 1944 German document from the US National Archives indicates the correct Waffenfarbe and shoulder board insignia for every type of unit in the German Feldheer.

“Übersicht der Truppenkennzeichen des Feldheeres”

WWII German Army Regulations on Cleaning and Maintenance of Uniforms and Equipment

This material is translated from the 1943 edition of the Wehrmacht manual “Hilfsbuch für den Hauptfeldwebel” by Hans Rödel.

Instruction Sheet Regarding Care and Upkeep of Clothing and Equipment Items

1. Means for individual cleaning and maintenance of clothing and equipment

Enlisted men are to obtain by their own means the following commercially available goods, and to constantly keep them in usable condition:


1 large clothing brush (Kleiderbürste), 1 stiff brush for removing dirt (Schmutzbürste), 2 small brushes (Auftragsbürste), 1 polishing brush (Blankbürste), 1 bristle brush (Borstenbürste), 1 clothes whip (Klopfpeitsche).
Shoe cream or shoe polish, leather fat, curd soap (Kernseife).
1 pair scissors, sewing and darning needles, darning yarn, black white and gray thread, various buttons.

2. Cleaning and Maintenance of individual uniform and equipment pieces

I. General

The soldier is obligated to keep the uniform and equipment items in his possession well and carefully maintained. The soldier himself has to care for the cleaning of his underclothing and must pay for the cleaning costs out of his own income. The cleaning of the remaining items issued to the soldier for his use is also his responsibility, insofar as he can clean them with water, soap, etc. – or if need be, with a soft brush.

All items must be kept constantly maintained. Every soldier must himself perform small repairs on the uniform and equipment items he was issued, as long as these do not require specialized craftsmanship knowledge to be repaired, for example replacing buttons, replacing hooks and eyes, sewing split seams. The necessary supplies must be provided through his own means. Larger maintenance tasks are to be given to the Bekleidungsoffizier promptly, meaning when the damage first happens.

II. Cleaning of uniform pieces

Underclothes: Underclothes and sports shirts should soak in cold soapy water for a long time, at least overnight. A brush may not be used for the cleaning of underclothing and sports shirts. Sports shorts and swim trunks, collar binds, helmet bands and arm bands are not to be boiled, rather just washed by hand in warm soapy water (without a brush) and then rinsed.

Knit wool items: All knit wool items should be washed in lukewarm water or soapy water. Boiling or the use of hot water or brushes is forbidden, this causes the wool to become matted.

Wool uniform items: Wool uniforms should whenever possible not be washed. They are cleaned by brushing and by beating with a clothing whip. The use of wire brushes is forbidden. Stains can be removed with gasoline or diluted Salmiak (ammonium chloride). The Exerziergarnitur (uniform for field use) may be cleaned with a short-trimmed bristle brush and soap in places that are heavily soiled.

HBT uniform items: HBT uniforms can be cleaned with a bristle brush and soap in hot water, but long boiling is to be avoided.

Bread bag: The bread bag is to be cleaned with a soft brush, warm water and Kernseife (curd soap). Drying the bread bag near an oven is to be avoided, as this makes the leather straps brittle. III. Care of footwear Leather uppers that are poorly cared for, or that have been improperly cared for with inferior, poorly-suited care products, become hard and brittle. Hard upper leather is in most cases the root cause of the formation of hard creases and foot damage. The soldier is obligated to keep the footwear items in his possession well and carefully maintained.

III. Care of footwear

Leather uppers that are poorly cared for, or that have been improperly cared for with inferior, poorly-suited care products, become hard and brittle. Hard upper leather is in most cases the root cause of the formation of hard creases and foot damage. The soldier is obligated to keep the footwear items in his possession well and carefully maintained.

Greasing: The leather of footwear must be kept soft. It is necessary to treat the upper leather at least once a week with acid free leather oil or leather fat. Before doing this, dirt and any remaining traces of polishing product must be removed by washing with lukewarm water. Excessive use of grease should be avoided, otherwise the product will soak through, soil the interior of the footwear, and also, in warm weather, lead to burning, formation of blisters or sores on the feet.

Cleaning: The use of shoe polish on the foot part is to be limited to the smallest amount possible. Polishing work may only be done with a brush or cloths. Use of other products and the working of a “high gloss” finish on the foot part, are forbidden. A very light dusting of grease on the foot part during the daily cleaning results in a soft, march-ready boot. Wet-washing or rinsing of the interior leads to disintegration of the sole and with that, foot damages.

Treatment: Drying wet footwear in the vicinity of a heated stove, a radiator, etc. is forbidden. They should be stuffed with paper or straw and as much as possible aired out or put in a slightly warm place to dry. Before doing this, no product should be applied to the footwear. Wet footwear is not to be stretched out on chair legs, etc., as this deforms the wet leather at the rear seams. The boots can be put on by helping each other by hand, or with a boot jack. Bed and table parts, etc. may not be used for this, as it puts pressure on the caps of the heels. By stepping on the tip of the foot, it puts pressure on the upper leather and brings about rubbing on the toes.

IV. Miscellaneous

Overcoat: The rolled overcoat must immediately be unrolled upon return.

Mess kit, canteen and drinking cup: Never store the canteen for a long time. When cleaning, abrasive products like wire brushes, metal polishing cloths, sand, etc. are not to be used. The simplest materials are water and brushes. After cleaning, it is good to rinse with water that is as hot as possible, and wipe completely dry. Mess kits and canteens are not to be kept closed with moisture inside. With use, the inside of the mess kit will develop a yellow-brown to gray-black visible coating (oxidation layer), that has no effect on the taste, the appearance or the quality of food. It protects against being worn out and may not be removed.

Wehrmacht Regulations on the Fit of Uniform and Equipment Items

Overview of the Fit of Clothing and Equipment Items

[Translated from “Hilfsbuch für den Hauptfeldwebel” by Hans Rödel, 1942. Translated by Chris Pittman]

Field cap: The cap is to be worn slightly tilted to the right, in such a way that the lower edge is 1 cm over the right ear and 3 cm over the left ear, and about 1 cm over the right eyebrow as seen from the front. The cockade is in line with the center line of the face. The cap must fit in such a way that the back of the head is covered.

Visor cap: The cap should sit horizontally on the head as seen from the front, the cockade in line with the center line of the face. It must be large enough to cover the back of the head. The lower edge of the visor should intersect the eyebrows at its lowest point.

Field blouse: The field blouse must fit over the wool sweater in such a way that it is wide and blousy in the torso, and the man is not hindered in his movements. Folds created when the belt is fastened are to be distributed in such a way that they do not press on the body. The belt buckle sits between the two lower buttons. The blouse should just cover the buttocks. The arm hole is large enough that the man can freely move his arms without causing pinching in the armpit. The lower edge of the sleeve extends to approximately 3 cm below the wrist. The collar bind should extend about 0.6 cm – 1 cm over the collar edge.

Waffenrock: The Waffenrock must hang freely in the skirt, without causing folds in the front and without jamming. The middle seam should be about 1 cm over the hips in such a way that the lowest front button should be covered by the belt. The arm hole is large enough that the man can freely move his arms without causing pinching in the armpit. The lower edge of the sleeve extends to approximately 3 cm below the wrist. The collar must be large enough that a collar bind can be worn. It must not protrude on the sides or in front. The shoulder boards should lie on the center of the shoulders. The skirt should cover the buttocks.

Overcoat: The overcoat should reach the center of the lower leg. The fastened belt lies above the rear belt and leaves it free. The sleeves extend 1-2 cm past the jacket sleeves. The collar sits lightly on the jacket collar in the rear and in the front must be loose enough that you could fit a flat hand between the jacket collar and the overcoat collar. The shoulder boards should lie on the center of the shoulders.

Collar bind: When the field blouse is open, the collar bind is buttoned to the 5 buttons in the neck hole of the jacket, and is visible about 1 cm all the way around. Both ends must be long enough that they extend at least to where the neck opening is closed. When the field blouse is closed, the collar bind remains buttoned to the three rear collar buttons of the field blouse. It should be visible over the collar about 2-3 cm in front, and elsewhere around 0.6 cm all the way around.

Wool trousers: The trousers should pull moderately tightly against the rear split. The lower ends of the legs may only extend to the upper edge of the boot heel in the rear, they may not bulge in the front. The rear closure belt must sit tight above the hips and the fastened leather belt must lie on the trousers beneath the buttons.

Boots: The boots must fit tight in the heel and along the length, to avoid squeezing. When walking, the heels lift a little from the sole and may not slip up and down. The tips of the boots or shoes must offer 1-1 1/2 cm space when toes are fully outstretched. With jack boots, do not choose too narrow shafts.

Belt: The belt sits on the rear belt buttons of the Waffenrock, on the belt hooks of the field blouse, with the overcoat the hooks on the field blouse are pulled through the slits and the belt sits on that, the belt sits over the waist strap. The bayonet frog sits a little in front of the left side belt hook on the field blouse, with the overcoat and Waffenrock it is worn in the corresponding place. The middle of the eagle on the belt buckle is in line with the front closure buttons on the Waffenrock and field blouse, with the overcoat it is in the middle of the two button rows. With the Waffenrock, the buckle covers the lowest button, it should be between the two lowest button on the field blouse, an on the overcoat it should be between the two lowest button pairs.

Helmet: Seen from the front, it should be 1 cm over the eyebrows. From the side, it covers half the ear.

Tornister: The Tornister is fitted with the rolled overcoat. The upper surface intersects with the lower collar edge, the lower edge of the Tornister should come to around the middle of the belt. The carry straps and auxiliary straps should not pinch and should not cut in under the arms.

Awards: The marksmanship lanyard is worn from the right shoulder to the second button on the Waffenrock or field blouse. Rank badges on the sports suit: horizontally on both arms, 12 cm beneath the arm hole, a 15 cm long and 1 cm wide strip of white cotton for NCO ranks. Rank badges on the sports shirt: Around the neck opening, a 1 cm wide black twill band for NCO ranks.

WWII German book on orienteering: “Karten- und Geländekunde” (Maps and Landforms)

Undated WWII-era German manual, “Maps and Topography.” This does not appear to be a military issue manual, but there is information here about reporting, so clearly this was geared towards military/paramilitary use. Topics covered: Maps, landforms, orienteering in terrain using a map, the preparation of sketches. This is a scan of the original, German language of course.

Download “Karten- und Geländekunde” as PDF

The Gruppe as Feldwach

     In our portrayal of security troops, our main activity in the field is setting up a Feldwach, a guard outpost. Generally, we guard important roads or other targets that could be subject to sabotage or attack by partisans. What follows is a translation from the German Army manual H.Dv. 130/2a, “Ausbildungsvorschrift für die Infanterie, Heft 2a: Die Schützenkompanie,” from 1942. This material is intended for rifle squads in a regular Infantry unit, no doubt there were differences in how the Feldwach was set up by undermanned, underequipped security forces in the rear. But the general principles of how such outposts were to be arranged likely still applied, and we attempt to conform to these principles whenever possible, though we are limited by our lack of manpower and equipment.

The Gruppe as Feldwach

     The Feldwach when serving as a forward post is often in Gruppe strength [squad strength, 8-10 men]. It can also be formed with stronger security forces.
     The Gruppe as Feldwache helps protect resting troops from surprise or attack by the enemy.  They prevent breakthroughs of enemy scout troops. Thrusts of motorized enemy forces, especially armored forces, are defended against.
     If no other orders are given, the position must be defended.
     The Gruppe as Feldwach is always reinforced by anti-tank weapons, and often by heavy machine guns, light or heavy mortars, and/or Infantry engineers.
     They are generally equipped with flare pistols, a bicycle for a messenger, hand grenades, and armor-piercing ammunition in drum magazines.
     They can be supplied with entrenching tools, materials for obstacles, Tornister [field packs] and rations.
     At night, in weather conditions with poor visibility, in terrain that offers limited observation, and when the enemy is near, the number of Feldwachen is increased. The terrain between Feldwachen is observed by scout patrols.
     The position must be chosen so that good observation and fields of fire can be achieved. Mostly, the position lies along a road or another path.  The possibilities of movement for enemy armored forces or vehicles must be considered. Proximity to terrain obstacles or use of terrain that is unsafe for tanks is to be strived for.
     Construction of a battle-ready roadblock on the road to be secured increases possibilities for defense. This roadblock must be dominated by the fire of weapons, especially anti-tank weapons, and it must be able to be defended.
     The position, when possible, must be chosen so that it is concealed. A concealed path that leads to the securing troops makes it easier for messengers and for reinforcement in case of enemy attack.
     The Gruppe must know their task. This includes the field of fire, the location of strongpoints, and the time to open fire.
     The Gruppenführer [squad leader] sets the Gruppe up in such a way that the field of fire is controlled by their weapons. For this purpose the Gruppenführer stays with the light machine gun. He arranges the rifle positions on one or both sides of the machine gun.
     The Gruppe strongpoint is made up of multiple foxholes. They should not extend over more than 30 meters. Each foxhole is occupied by 2 or 3 riflemen.
     The foxholes are irregularly staggered, 4 to 8 meters apart depending on depth. As a further step they can be connected by shallow trenches, or connecting trenches.
     If the machine gun has the task of firing at long ranges, it should fire whenever possible from one or more alternate positions. Concealed paths between alternate positions are a prerequisite.
     If no enemy activity is expected during construction of the positions, and if time is available, ongoing reconnaissance and preparation can go ahead of the construction.
     The construction is mostly limited by camouflaging and arrangement of the position and by the construction of a battle-ready roadblock.
     For observation of terrain on which an enemy would approach, for local protection of the roadblock and of anti-tank weapons as well as for their own security, the Gruppenführer can set up one or more guard posts in strengths of 1 to 3 men, depending on situation and terrain.
     The remaining members of the Gruppe, after the position is constructed, remain battle-ready in the defensive positions. If the situation allows, they can take cover in the rear of the defensive positions.
     During the day, the guard must observe the terrain over which an enemy would approach and especially the roads leading to the enemy and the areas between them. He himself must stay out of sight of the enemy.
     Occupation of high ground is advantageous for observation and listening. At night, and in weather conditions with poor visibility, the guards mostly remain in immediate proximity to a road or other path.
     The guard is equipped with binoculars and a method for signaling, and often also with a machine pistol.
     Smoking can be permitted. It is recommended that the guard sit or lie down if possible.