This German issue Zeltbahn shelter quarter is a standard “midwar” example with zinc buttons and grommets. There is an illegible partial maker stamp and what appears to be a 1940 date. There are numerous and extensive repairs.
What may be less clear, looking at an item like this, is when and by whom it was repaired. In collector circles there is talk of a wartime Zeltbahn repair kit composed of circular patches and glue. We can see at least 20 of these supposed “repair kit” repairs on this Zeltbahn. In years of collecting, this writer has never seen an original “Zeltbahn repair kit” nor any reference to one in a period document- in other words, no evidence that this existed. That is not to say that it could not have existed, of course. Perhaps further research could shed light on this question.
Some of the glued circular repairs on this Zeltbahn are on top of other machine stitched repairs, indicating repairs to this were done by different people at different times. 1940 to 1945 might have been enough time for a Zeltbahn to have become worn out this way. But these were used postwar as well, not only by individual hikers and campers, but on a large scale by German and foreign civil, military and paramilitary organizations. I would suggest that little may be known today by collectors about the institutional level repair practices used after 1945 to maintain these surplus items which were no longer in production.
Another point of interest here is that one corner of this wartime Zeltbahn has been replaced with a corner from a prewar Zeltbahn with aluminum grommets and buttons.
The light side of this Zeltbahn shows a pattern of small light spots. This piece shows it particularly well. This “fish scale” or “corn cob” type pattern is not uncommon to see on German Zeltbahn fabric. It can also be found on Swiss made splinter camouflage fabric as used by the Swiss Army. Some collectors have mistakenly assumed that only Swiss fabric has these dots. I am not sure if this is a deliberate aspect of the pattern or (perhaps more likely) some artifact resulting from the way the fabric was printed or finished.
Did you know that German mess kits are also Dutch ovens? In the book “Tornisterlexikon für den Frontsoldaten,” published by the Wehrmacht during the war for use by field soldiers, there is a recipe for baking bread in a mess kit.
The German word for “mess kit” was Kochgeschirr. Literally: cooking utensils. It says “cooking” right in the name. And of course there are countless photos of soldiers cooking food in the mess kit. Here are just a few.
German soldiers were issued fresh bulk food daily, including a warm meal- in ideal conditions. An Esbit stove and a mess kit could heat warm food that arrived cold. But wartime and veteran memoirs are full of accounts of soldiers supplementing the issued food with whatever they could find. Often, what they found had to be cooked, and the mess kit was often the only cooking vessel available for men who had to carry everything on their backs. Cooking in the mess kit was not a daily task for the majority of soldiers but historical documentation leaves no doubt this was a reality for many situations in the field.
These German Army bread bags are all prewar production pieces. This can be determined by features including the gray canvas, aluminum hardware and leather reinforced belt straps.
Despite these similarities, these bread bags also show many differences.
This factory made, enlisted issue German Army overcoat is from 1938. This is a well-preserved example of a 1936 pattern overcoat. At the time this was made, overcoats had sewn in shoulder straps. The factory applied straps were replaced at some point, which is common; these coats were worn through the whole war and people were transferred or got rank promotions, and often these were converted for use with slip-on style straps.
This greatcoat is complete with a quilted cold weather liner. After the disastrous winter of 1941-42 on the Eastern Front, German war planners had to hastily design, manufacture and issue improved winter clothing for 1942-43 and beyond. It was not possible to issue every soldier with the new padded winter suit, and so a wide array of substitute and replacement garments was created, including even garments made of paper. This quilted liner is made of rayon. The fabric is pieced together, perhaps made using scraps or recycled from something else. It is a factory made issue item with a RB number maker code and size stamp.
Here are some WWII mess kits with hand-engraved art. The most common method was what is called “rocker engraving.” Almost any sharp tool can be used for this. A steel nail with a tip filed flat and sharp like a tiny chisel is very effective. The markings are made by pressing the tool into the aluminum surface and rocking it back and forth, pushing it forward. A lot of stuff like this was made by in POW camps but some field soldiers did this in wartime as well.
“Inventory” by Günter Eich Written in a POW camp 1945
This is my cap, this is my overcoat, here is my shaving kit In a bag made of linen.
Food can: my plate, my cup, I have in the tin-plate scratched my name.
Scratched here with this precious nail, that from covetous eyes I protect.
In my bread bag are a pair of wool socks and a few things, that I reveal to no one,
thus it serves as a pillow for my head at night. This cardboard here lies Between me and the ground.
The pencil-lead I like the most: In the day it writes the verses that I thought up at night.
This is my notebook, this is my Zeltbahn, this is my hand towel, this is my thread.
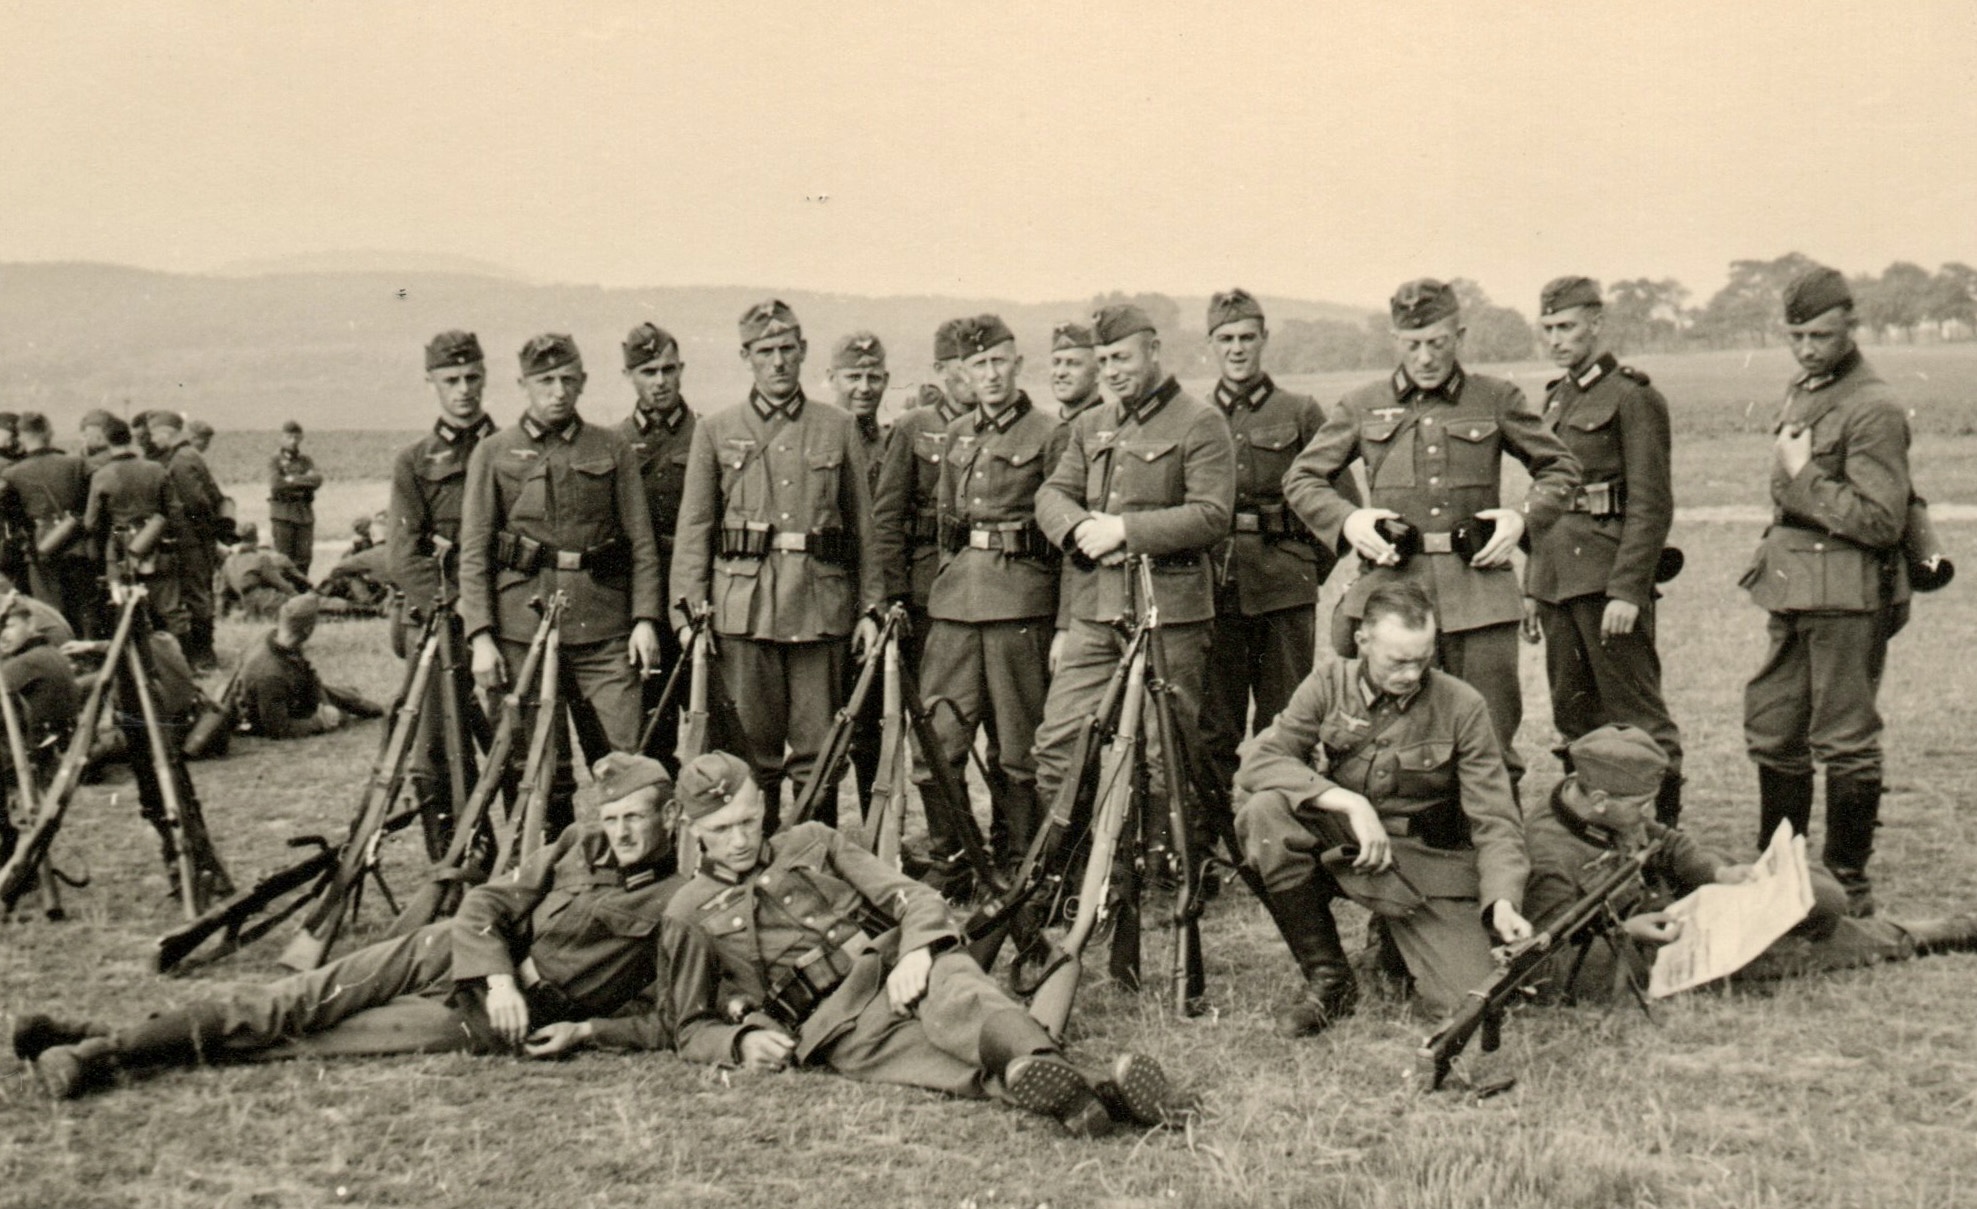
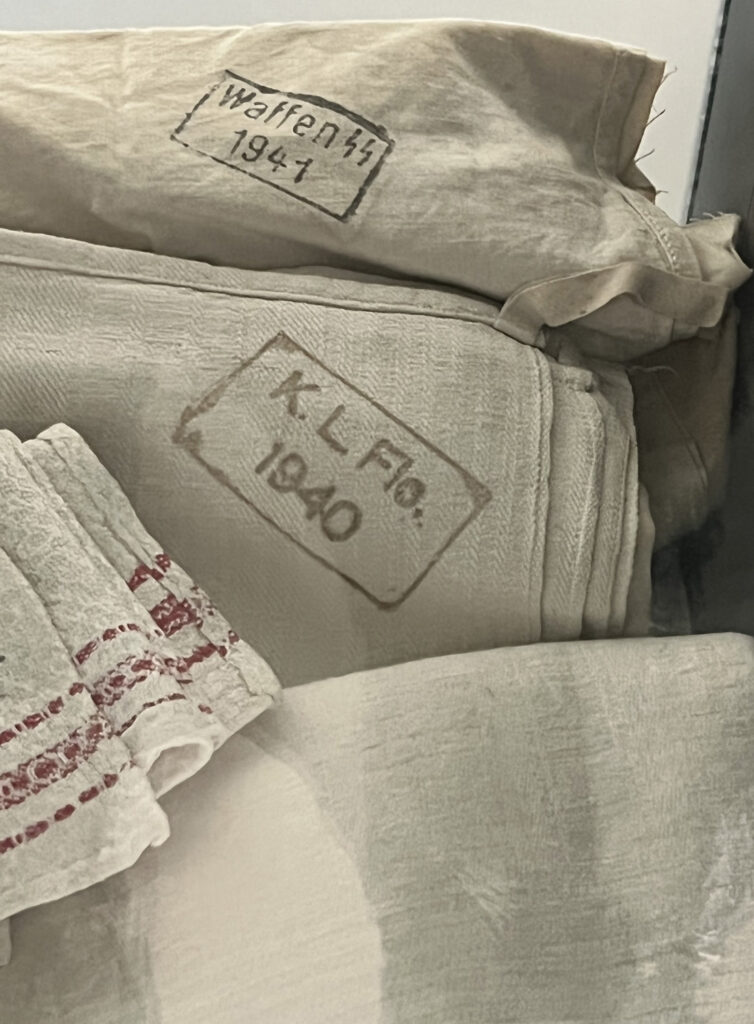
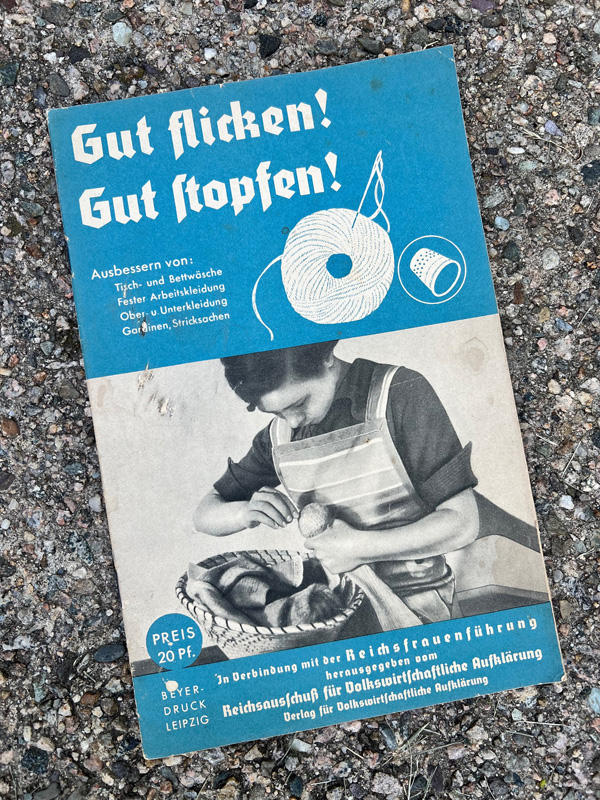
This booket, “Gut flicken! Gut stopfen!” (Patch well! Darn well!), was part of a series published by the Reichsausschuss für Volkswirtschaftliche Aufklärung, in connection with the Reichsfrauenführung. It is undated but was released around 1937.
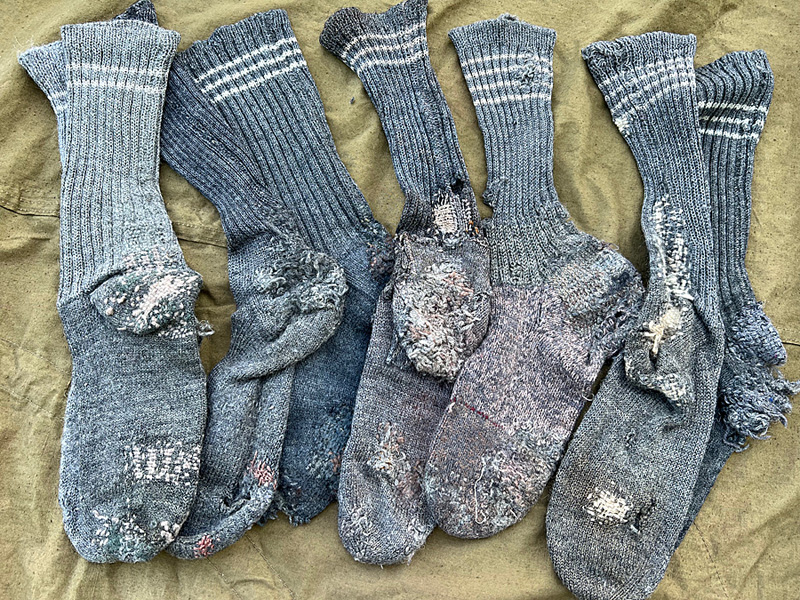
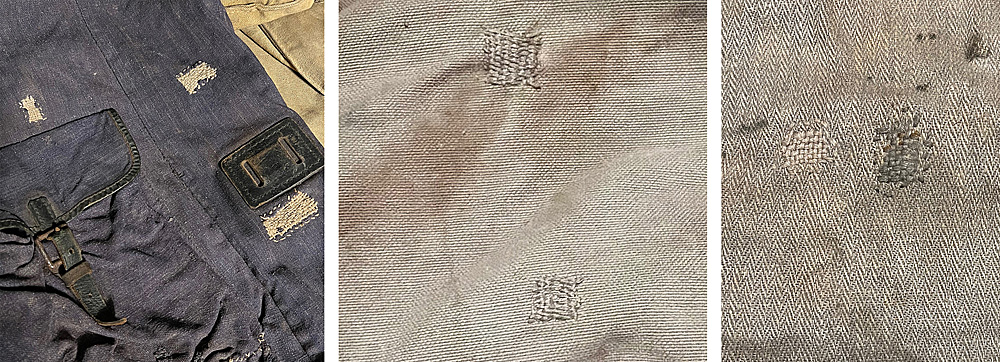
The book is intended for women, who were expected to be able to repair the clothing for all the members of the household. In that era, not only housewives would have been familiar with basic sewing and mending techniques. These were important skills in a time when clothing and fabric were more expensive, and people had less of it. Wehrmacht regulations stated that “every soldier must himself perform small repairs on the uniform and equipment items he was issued, as long as these do not require specialized craftsmanship knowledge to be repaired, for example replacing buttons, replacing hooks and eyes, sewing split seams.” These military issue socks were worn by German soldiers at the end of the war, at the time of surrender, and for some time afterward. They show extensive darning and patching repairs. These repairs were likely done by the soldiers themselves.
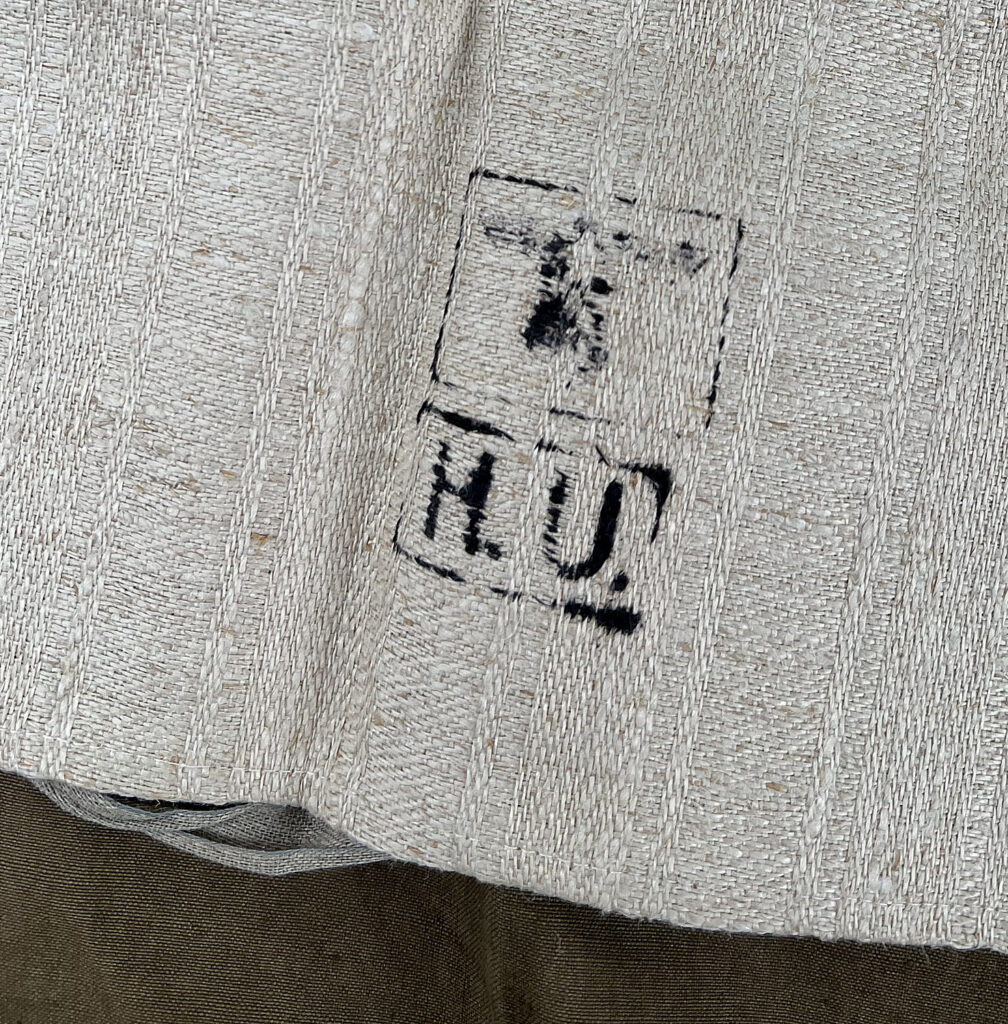
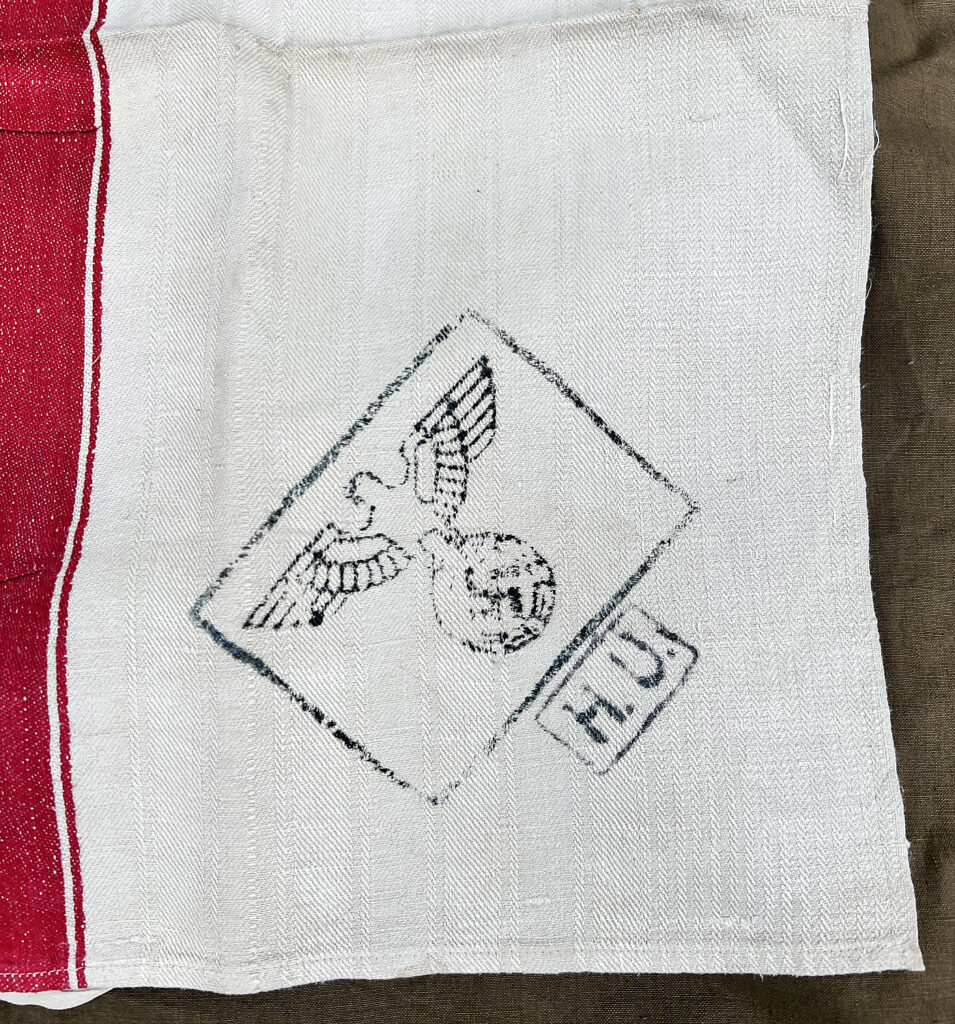
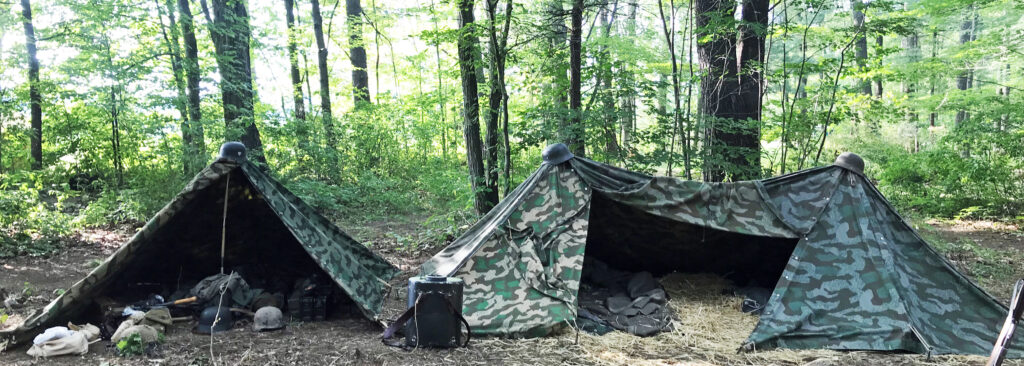
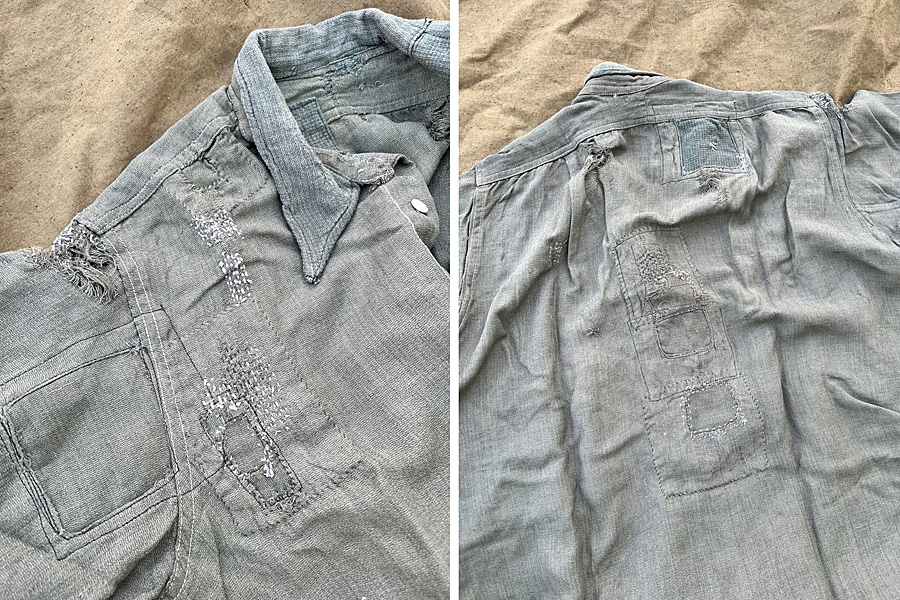
This soldier’s shirt also has been patched and darned.
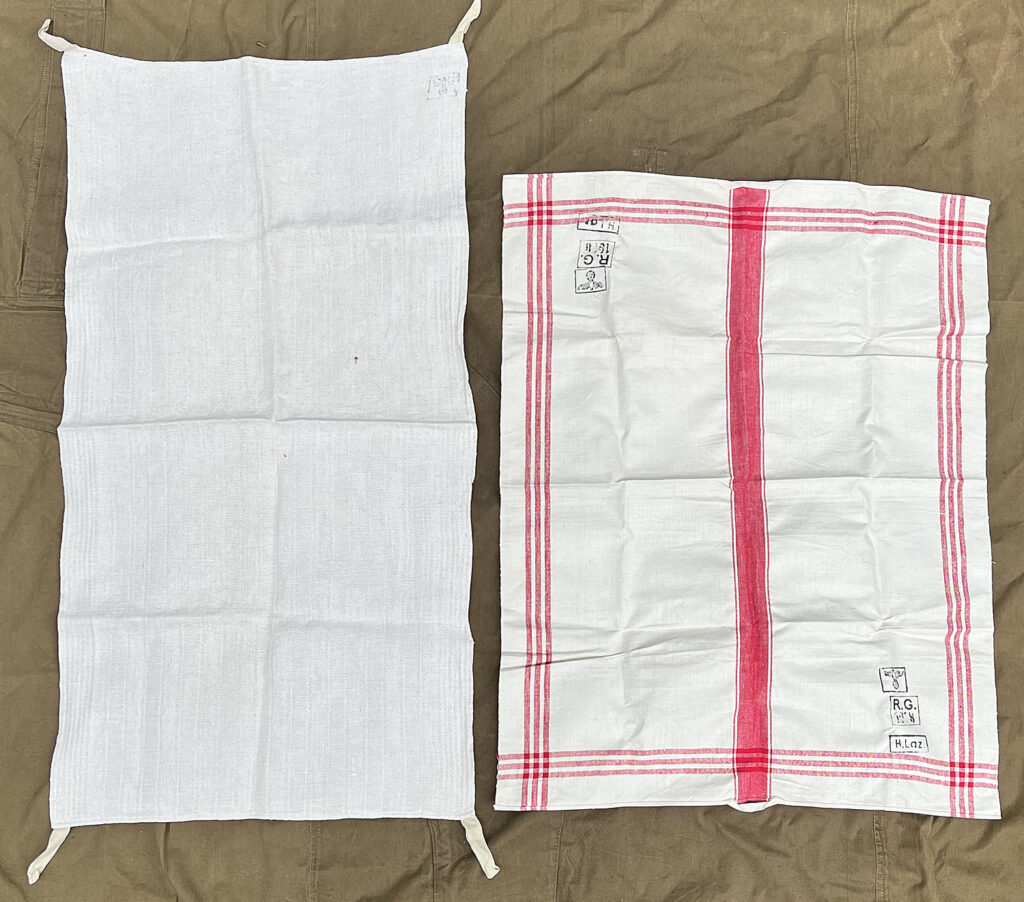
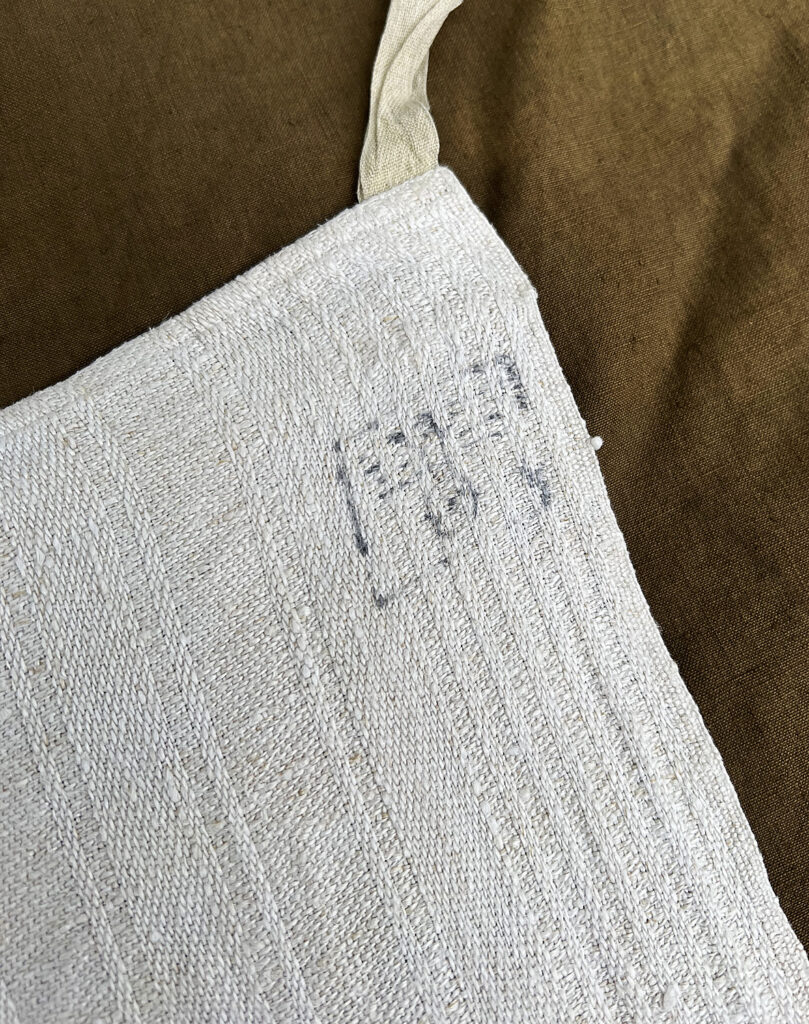
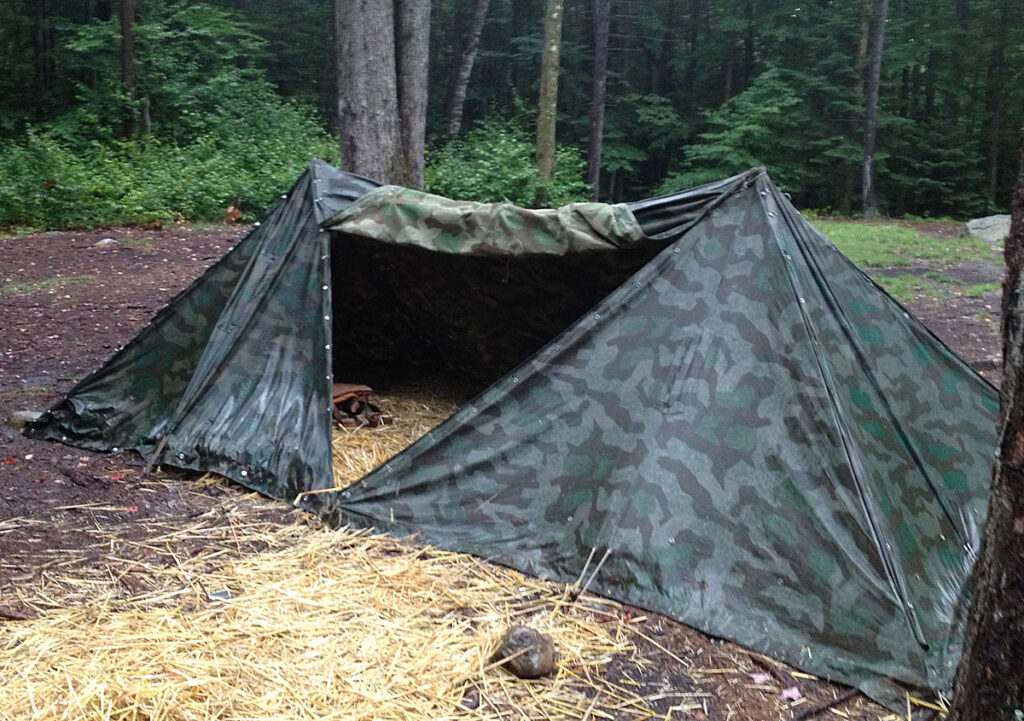
Not only knit items were repaired by darning. Canvas equipment items such as rucksacks and clothing bags can be found with darned as well as patched repairs.
Period darned repairs on canvas and linen
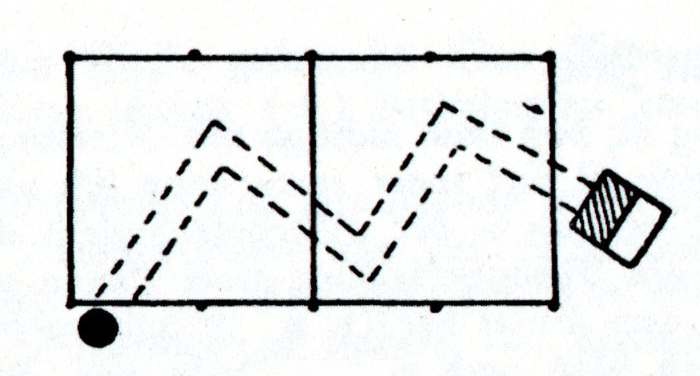
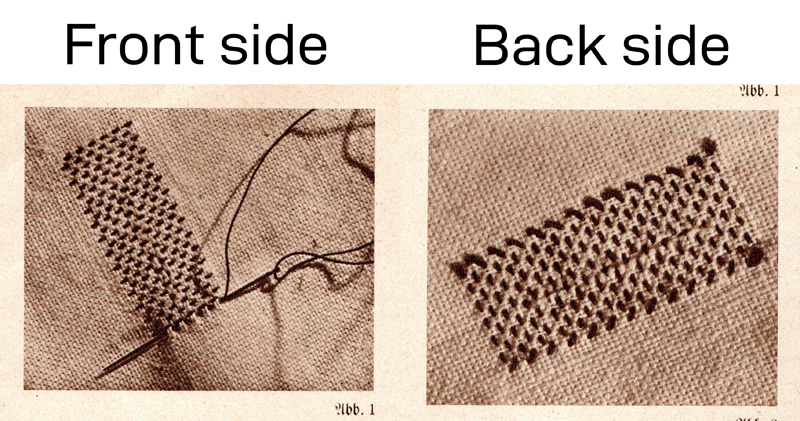
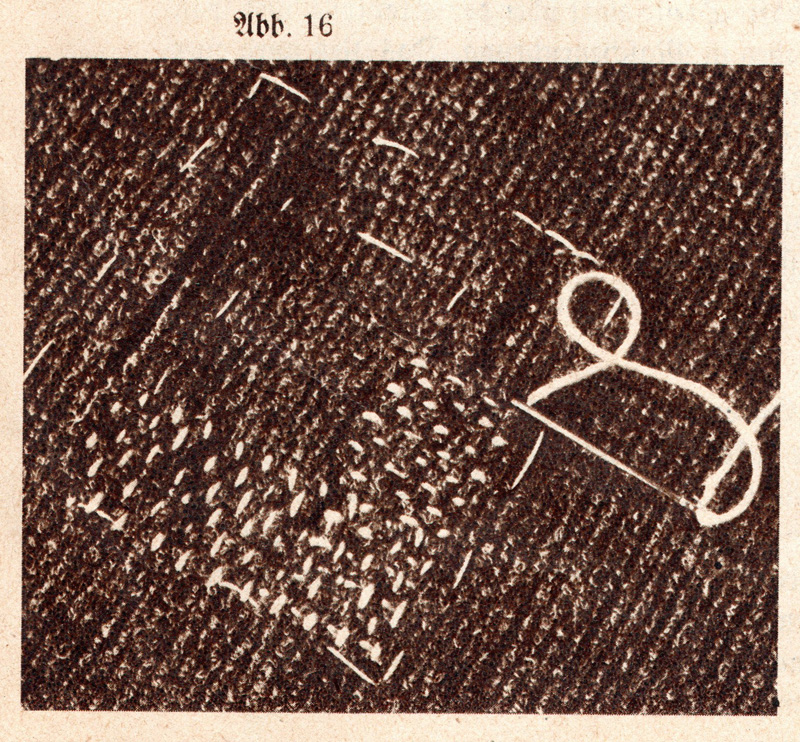
Let’s look at some of the repair techniques shown in the 1937 book. There is instruction on darning techniques. The book takes it for granted that the reader is already familiar with the basic concept of darning and instead gives some technical tips about best practices, including what kind of thread to use and how to approach repairs on different fabrics. For readers who are not familiar with darning, there are lots of instructional videos online that show how to do it; the darning tips in this book are much more readily understood with this background knowledge. This illustration shows a darned repair where the tear in the fabric ran parallel to the fabric’s weave. This type of repair can also be used for wool, it is noted in the book.
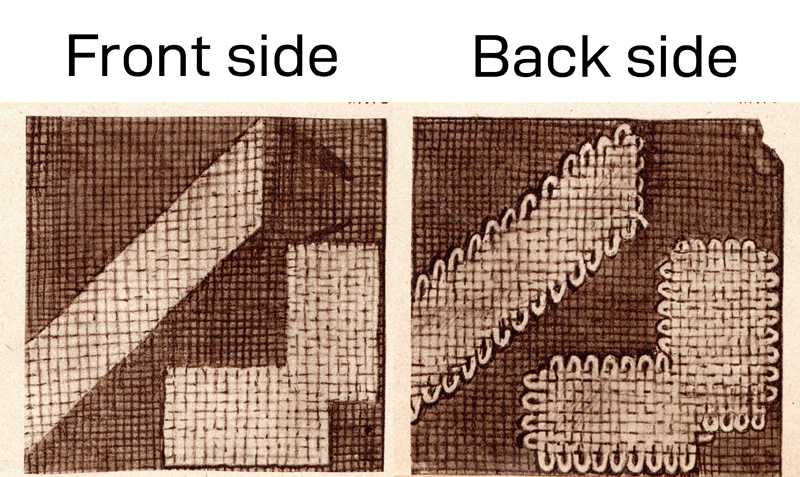
This illustration shows darned repairs to damage that runs diagonal to the weave of the fabric, and to an L-shaped tear. This style of darning, where the threads go in one direction and then are woven in a perpendicular way, is commonly seen on used items from that era.
This is how holes in linen were to be repaired, with darning.
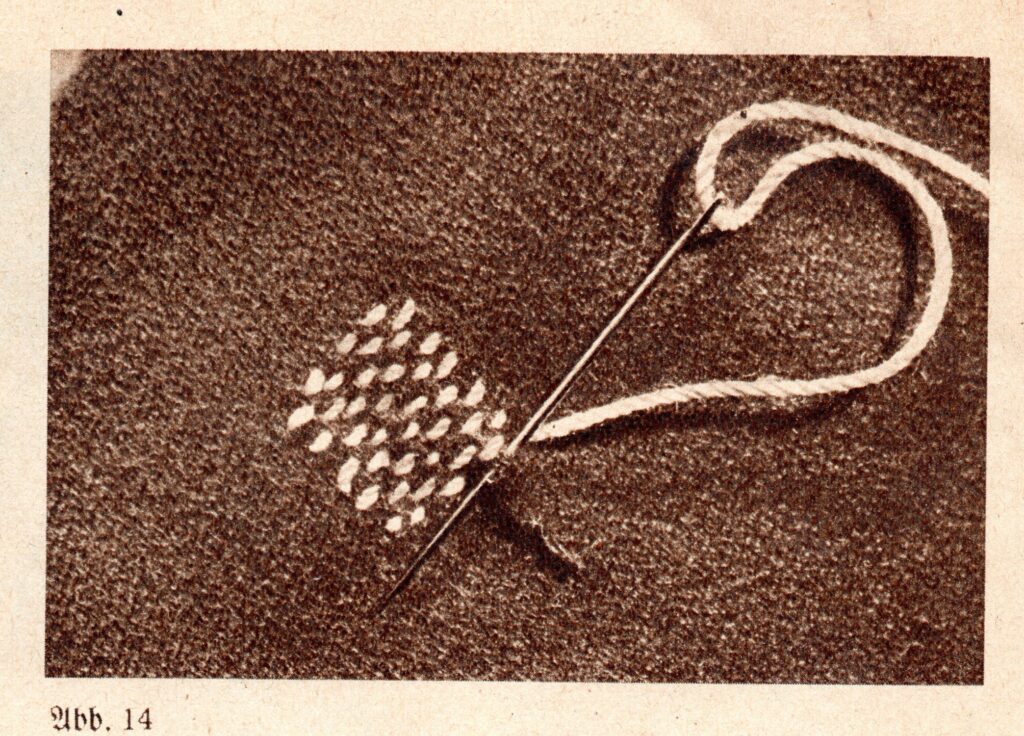
This is a method of darning a rip in wool cloth, of the type used for WWII German uniforms. For the illustration, a thick, contrasting thread was used, to enable the viewer to easily see the technique. The book suggests women use much finer stuff- human hair.
The type of thread to be used for darning depended on the material being darned. Cotton fabric was to be darned with cotton thread or cotton yarn, because silk thread would not withstand being boiled when cotton clothing was cleaned. Silk fabric was darned with silk thread. Wool fabrics could be darned with silk or cotton, and heavy fabrics could be darned with linen.
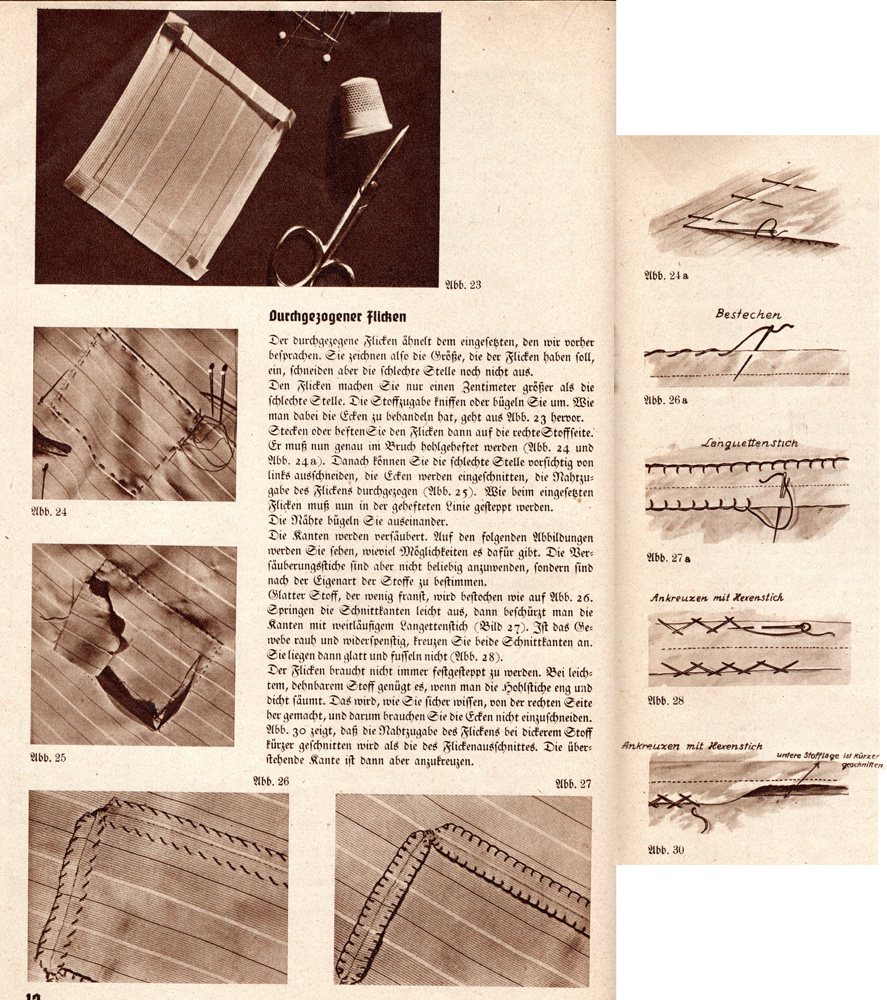
Different repair methods were to be used for different types of clothing. A variety of patching styles were devised, which are illustrated in the book and which we will show below. Some of these techniques seem to have been more widely used than others. The book states that heavy outerwear could be repaired with sewn-on patches, sewn-in patches, or “pulled through” (durchgezogen) patches. Light outerwear could be repaired with “pulled through” patches or “couch stitch” (kordoniert) patches. Wool fabric could be repaired with “darned in” (eingestopft) patches.
Sewn-on patches
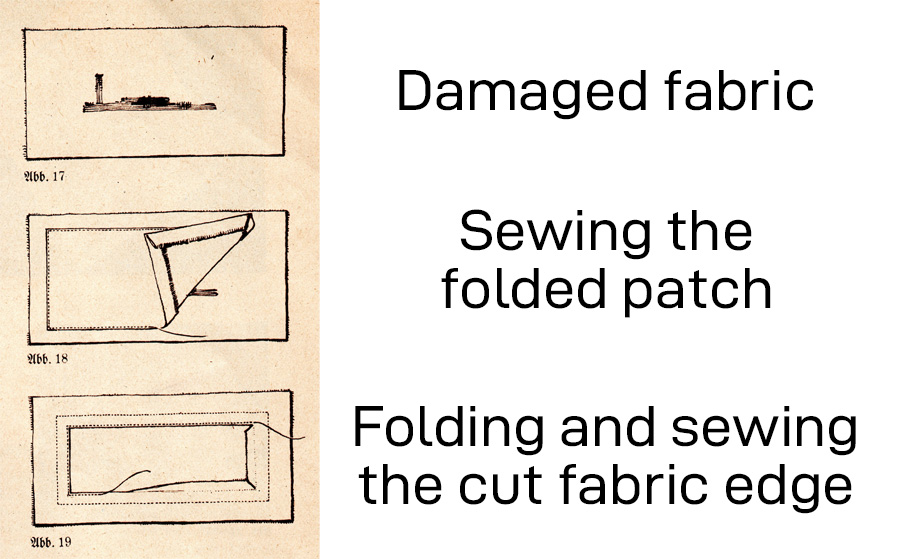
According to the book, this style of repair is easy to do and was often used. This was well-suited for fabric that was often stressed, such as bedding, hand towels, work clothes, skirts, etc. A square or rectangular patch would be folded and stitched over the damaged area. The damaged area would then be carefully cut away, with the cut 1.5 cm inside the patch line. The corners are then cut another 5 mm so that the cut edges of the fabric can be folded under, then stitched all the way around. This is not mentioned in the book, but this style of patch is commonly seen on Wehrmacht Zeltbahnen (shelter quarters).
Sewn-in patches
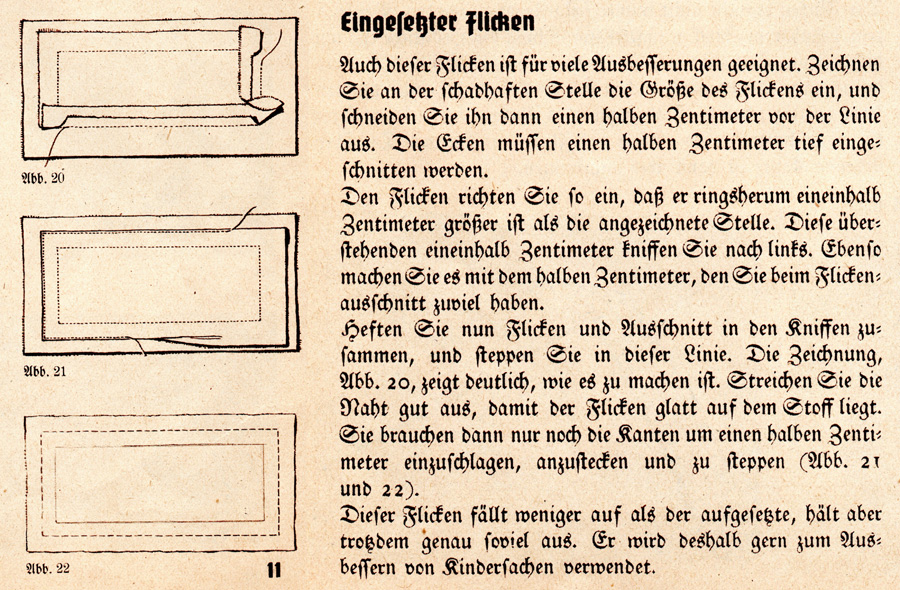
This was a somewhat more challenging type of repair than the sewn-on patch. It failed less often than the sewn-on patch and was well-suited for children’s clothing. First, a line would be drawn around the damaged area, the size of the patch. Then the damaged area would be cut out 5 mm inside the line, with 5 mm cuts in the corners. The patch would then be applied, carefully folding as indicated in the illustrations.
“Pulled through” patches
This was similar to the sewed-in patch but the damaged area was not cut away. This is not a style of repair that I can remember having seen on period items and may have been a relatively advanced technique.
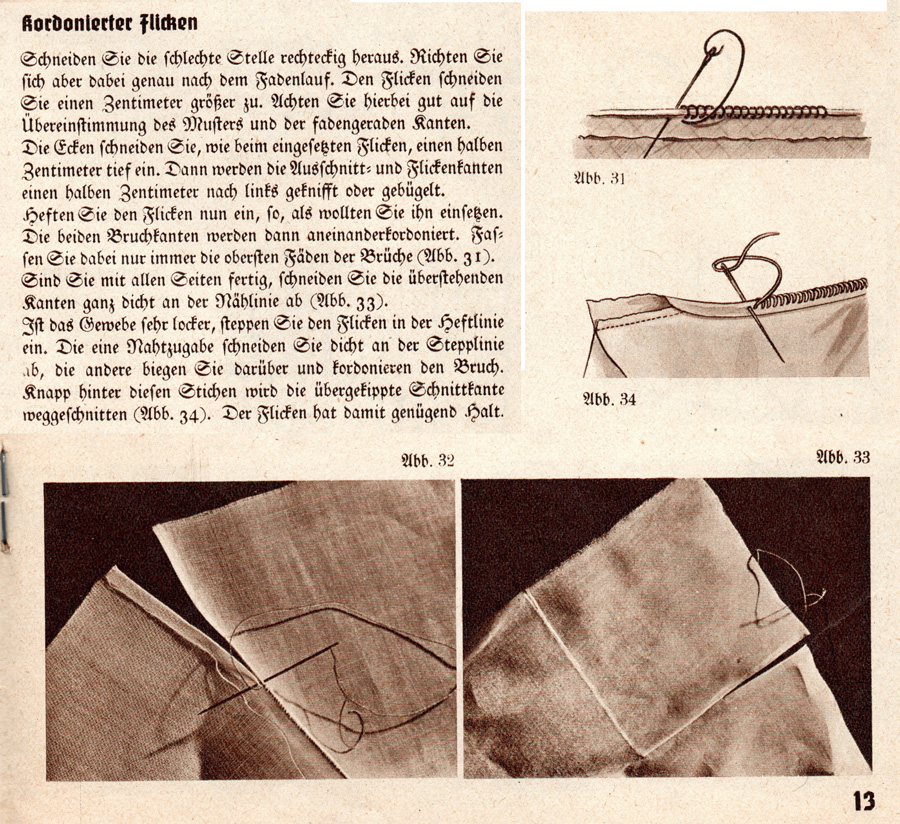
“Couch stitch” patches
This again is a style that I do not recall having seen used.
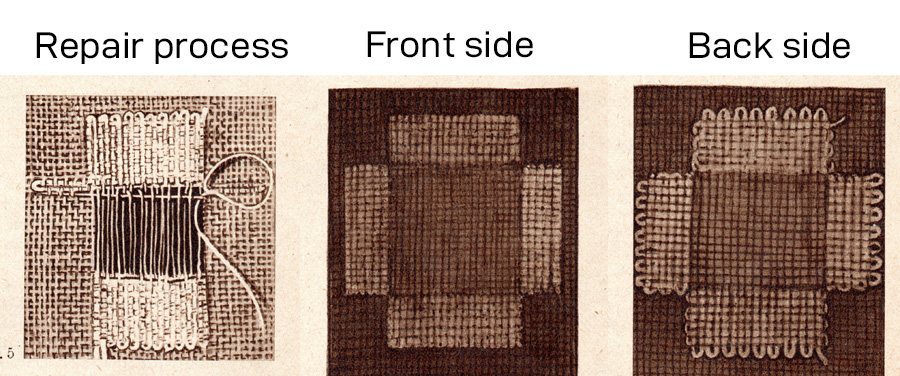
“Darned in” patches
For this style of repair, the damaged section of fabric would be cut away in a square or rectangular shape, carefully cutting along the weave of the fabric. A patch of the same fabric the item was made of would be cut exactly the size of the cut-out. The patch would be inserted, with the edges of the patch pressing against the cut-out edges all the way around. The edges would then be darned together. This could be done with wool fabric, taking into account the direction of the wool nap.
All of this information about darning and patching takes up the first 13 pages of this 24-page booklet. The rest of the book goes into detail about repairing knits and lace, restoring trousers, repairing armholes, replacing the upper parts of dresses, how to flip over collars of shirts, how to turn a worn-out shirt into a nightshirt, how to restore worn trouser cuffs, and more. Some of this would be considered tailoring, by modern standards. I think it is true to say that many skills that we regard as specialized and advanced today, were much more widespread in the past, when a sewing machine was an appliance found in most households.
The ability to mend clothing is valuable. A small hole, immediately darned, requires little effort and is often almost invisible. A quick repair to minor damage can prevent having to later make a choice between trying to repair major damage, or replacing the item.
In wartime Germany, rationing and availability of ingredients required people to change and adapt. It may not have been possible for soldiers or civilians to eat meat every day. In 1942, a new cookbook for vegetarian and low-meat field kitchen dishes was released. The recipes in this field kitchen cookbook were ones that were already in practical use. It was noted that it is easy to make delicious meals with abundant meat, even simply prepared, because the hearty meat juices or drippings form a basis for rich flavor. For meals with vegetarian ingredients, field kitchen cooks were advised to carefully and correctly handle the ingredients before and during preparation, to make proper use of available seasonings and herbs (especially herbs that could be grown in Germany), and to make good, tasty sauces.
The first recipe in the book is one that uses the tasty sauce strategy. It’s for potato Gulasch. Roasting flour, butter and onions together with some tomato paste in the bottom of the pan and then deglazing it with broth creates a richly flavorful coating for the potatoes. The quantity in the recipe is for one person but the book notes that this may be enough for two and indeed, I prepared the one person quantity and got three meals out of it.
Here is the original recipe from “Fleischlose und Fleischarme Feldküchengerichte” by Richard Schielicke, 1942.
“Potato Gulasch
Up to 1000 g potatoes 10 g fat 2 g dehydrated onions 10 g tomato paste or Condimento 10 g flour 0.5 l bone broth or water with seasoning Season with salt, vinegar, paprika
Lightly brown the flour in the fat, add the onions and roast them together with a very small part of the tomato paste. Add the broth, stir until smooth and boil thoroughly. Peel the potatoes, dice them and slowly cook them in the sauce until done. Season with vinegar, some paprika if available, and the rest of the tomato paste.”
Typical German field fare relied heavily on easily prepared meals made with a limited range of ingredients. In many cases, issues with supply and availability of meat mandated the preparation of meals that used little meat, or were vegetarian. The 1942 cookbook “Fleischlose und Fleischarme Feldküchengerichte” (Vegetarian and Low-Meat Field Kitchen Meals) by Richard Schielicke gave tips on how to make hearty meals without relying on large quantities of meat. “Meals prepared with a sufficient quantity of meat, even when simply prepared, have in the hearty meat juices a good flavor basis that meatless and low-meat dishes lack. We must compensate for that, if of course only in part, through proper handling of the ingredients before cooking, better cooking methods, correct and appropriate use of particularly German seasonings, and the use of good, tasty Tunken (gravies).”
The 1941 cookbook “Die Feldküchengerichte” (The Field Kitchen Meals) gives the following instruction on making gravies.
“The basic ingredient is broth, to this is added a thickener, for example a roux (about 8 grams) or grated white bread (about 20 grams per 1/4 liter). We will differentiate between dark and light gravies. Light gravies consist of light broth and light roux. Dark gravies consist of dark broth and dark roux.
Gravies with flour as a thickener
a) Light basic gravy Melt fat, and roast finely chopped onions in this for a short time. Add flour and cook for a few minutes until light yellow, fill with bone broth or meat broth and cook for 20 minutes. The gravy can be improved by the addition of milk.
Variations of light basic gravy:
Herb gravy: add aromatic herbs of all kinds, especially parsley, chervil, chives, also wild herbs. Dill gravy: add dill Chive gravy: add chives Marjoram gravy: add marjoram Mustard gravy: add mustard Tomato gravy: add tomato paste or tomato powder Bechamel sauce: offset the light gravy recipe with one-third milk Horseradish gravy: Make Bechamel sauce and mix in grated horseradish
b) Dark basic gravy Melt fat. Add flour and slowly roast until brown, constantly stirring. Add onions and brown for a short time. Fill with dark broth and cook 20 minutes.
Dark broth for filling:
Roast smaller bones with soup vegetables and boil for a few hours. If dark broth is not available, fill with light broth or hot water and improve with yeast extract or seasonings.
Variations of dark basic gravy:
Herb gravy: add herbs, especially marjoram, thyme Pickle gravy: add pickles and pickle juice Mustard gravy: add mustard
c) Gravies with grated white bread as a thickener Cook grated white bread or Zwieback in the broth. In a pinch, it is enough to soak it and stir it into the boiling hot broth. Flavoring ingredients are as with the light and dark gravies.”
“Die Feldküchengerichte” goes on to provide instructions for “Tunkenkartoffeln” (Gravy potatoes). “Peel boiled potatoes, slice, and heat in one of the light or dark gravies.” The book gives a list of potato meals that can be prepared simply by making the corresponding gravy and heating prepared potatoes in them:
The “Ten Rules for the Field Cook” mandated that field meals were to be cooked thick, not soupy. An ample portion of cooked potatoes in a rich and flavorful sauce is a hearty and filling meal that yields a lot of satisfaction and energy. Even without meat, it is heavy comfort food. Home cooks in wartime were also encouraged to make simple, easily cooked meals like this to save energy for war work, and to be thrifty with raw ingredients in a time of scarcity.
The photo at the start of this article shows potatoes in a light gravy with marjoram. Marjoram was not widely used in the USA until after WWII but it had a long history in Germany where it had over 10 different local common names. “Fleischlose und Fleischarme Feldküchengerichte” says that marjoram is “an excellent seasoning for savory gravies, legume and potato dishes, and the good, old pea soup is unthinkable without it.”
I bought these photos on eBay from one of the various money-hungry unethical ghouls who sadly strips original photo albums and groupings into individual parts. Most of the photos were inscribed by the original owner with “Halberstadt 1940.” The seller indicated the photos depict Landesschützen-Bataillon 716.
Most of the men appear to wear converted Czech uniform tunics. The weapons in the photos are also Czech. 1940 was a critical time for the Wehrmacht supply chain as new waves of divisions were being called up as the war escalated. It was impossible to make enough new uniforms and equipment to supply all the new troops. These captured stocks had to be utilized. The boots, also, are mostly the obsolete Reichswehr model.
The Wehrmacht never was able to get away from using captured and obsolete uniforms, especially in second-line and home front units like Landesschützen troops. I previously posted a 1944 photo album showing converted parade tunics.
We have previously posted an overview of the Wehrmacht unit organizational charts, the KStN. In this overview we looked at the KStN for a Landesschützen-Kompanie. In this article we will look more deeply at the different structures for Landesschützen units in the occupied territories and compare that with the organization of these units inside the Reich.
The April 1942 KStN 4031 for a Landesschützen Kompanie in the “Heimatkriegsgebiet” (Home Front, within the Reich borders) can be found on the WWII Day by Day web site. There were five basic components to the Kompanie, namely a command element, three platoons, and a support element. The Kompanie was commanded by an officer equipped with a bicycle and a pistol. Working for him in the Kompanietrupp were the Hauptfeldwebel, also armed with a pistol, and a staff consisting of 5 messengers on bicycles and 2 clerks. The messengers and clerks were armed with rifles.
The three platoons in the Kompanie were identical. The platoon leader, like the Kompanie commander, had a bicycle and a pistol. He had a staff consisting of a Zugtrupp leader with a rifle, and four messengers, of whom one had a signal trumpet. The messengers were armed with rifles and two of the four had bicycles. There were four squads in each platoon, each with ten men. Each squad was led by a squad leader armed with a rifle. One of the squads had a machine gun team. The machine gun gunner and assistant gunner carried pistols in addition to the machine gun and ammunition, and had a hand cart for the gun. All of the other squad members carried rifles, meaning that in two of three squads, all 10 men carried a rifle.
The Kompanie support and logistics component was the Tross. This consisted of an NCO acting as paymaster, and an NCO in charge of equipment, both armed with rifles. The paymaster had a bicycle. There was also an NCO in charge of clothing, he had no weapon. The Tross also had a wagon drawn by two horses, which was driven by a two-man team, both with rifles.
In our previous KSTN article we looked at this organizational structure for a Landesschützen unit in the occupied West. Let’s look at this again and contrast it with the home front unit described above.
This is KStN 4033, from February 1941. The change in the command element is the presence of a car for the commander, as well as a driver armed with a rifle. There was also initially a horse for the commander, and a person tasked with caring for the horse. In 1943 the horse and caretaker were deleted. The structure of the platoons were exactly the same as described above, with a single machine gun team among the 4 squads. The big changes were in the support element. These units in the occupied territories had to be equipped for field operations if needed. As a result, there had to be a field kitchen, and an enlisted man to cook, with an NCO supervising. There were carts for rations and for luggage, and two horses for each of these carts, with another two horses for the field kitchen. Units that already were equipped with trucks were authorized to keep these. There was a driver for the truck, with the equipment NCO serving as co-driver. 3 enlisted men were tasked with driving the horses. There was also a medical NCO with a bicycle. He carried a pistol. All of the other members of the Tross had rifles.
Here is KStN 4034 from February 1941. This is for a Landesschützen-Kompanie in the occupied East.
These units were at times tasked with occupying large areas and were threatened by partisan activity and enemy breakthroughs. There were a number of changes that reflected this reality. The command element consisted of the Kompanie commander, mounted on a horse, as well as three NCOs- the leader of the Kompanietrupp, a vehicle NCO and an equipment NCO. There were four enlisted messengers, one with a signal trumpet and one who operated a signaling light apparatus. There was a car for the troop, a driver for the car, two cyclists, and a caretaker for the horse. With the exception of the Kompanie commander, who had a pistol, all of these men were armed with rifles.
As before, there were three platoons. Each platoon had a Zugtrupp with one NCO, armed with a pistol, and 3 enlisted messengers, one with a trumpet and one to operate the light signaling system. Each of the four 10-man squads had a leader armed with a rifle. Now, all of the squads had machine guns. The gunner and assistant gunner carried pistols.
The severe logistical challenges faced by units operating in the vastness of the Soviet Union necessitated an expanded support element. The Tross was now three different parts: the Gefechtstross (combat Tross), Verpflegungstross (rations Tross) and Gepäcktross (baggage Tross). The Gefechtstross was led by the Hauptfeldwebel, who had a bicycle. There was a light truck, a combat cart with two horses, and a field kitchen with two horses. The only other NCO was the medical NCO, with a bicycle. Enlisted men served as a clerk (with a bicycle), 4 stretcher bearers, a vehicle driver and a co-driver, 2 drivers for the horses, a weapons NCO assistant, and 2 cooks. The Verpflegungstross was led by the rations NCO, with a bicycle, and had a cart with two horses. Enlisted personnel drove the horses and accompanied the cart. The Gepäcktross was led by the paymaster, again with a bicycle, and there was a cart with two horses for the baggage. There were 2 drivers for the horses, as well as a tailor and a cobbler, all enlisted ranks.
It’s interesting to see the ways that the standard Landesschützen structure was adapted for increasingly challenging deployments. These troops were assigned a huge range of duties.