Dienstplan – Daily duty plan for Wehrmacht training

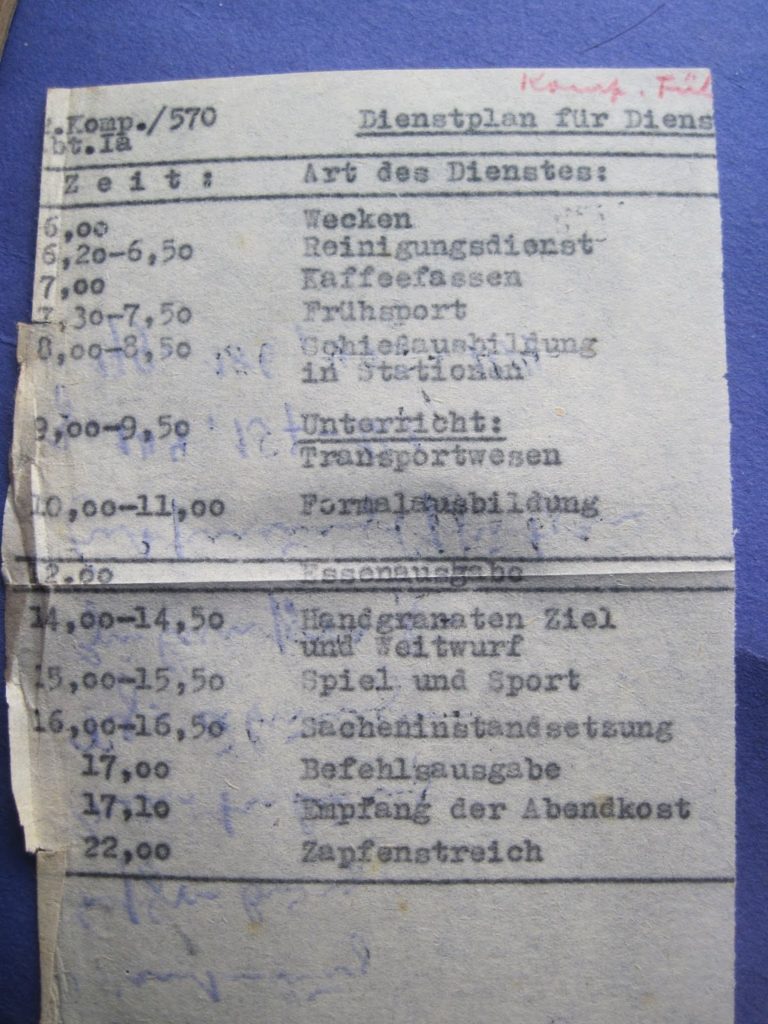
The Dienstplan was the daily duty plan. It would change each day, though some parts likely remained more or less constant. Here is an original example. Every German soldier would have been familiar with a schedule like this from his training time.


6:00 Waking
6:20-6:50 Cleaning duty
7:00 Get coffee
7:30-7:50 Early physical exercise
8:00-8:50 Marksmanship practice in stations
9:00-9:50 Instruction in transport matters
10:00-11:00 Formal training
12:00 Distribution of food
14:00-14:50 Hand grenade throwing, distance and accuracy
15:00-15:50 Games and sport
16:00-16:50 Maintenance of [uniform and equipment] items
17:00 Issuance of orders
17:10 Beginning of the evening meal
22:00 Zapfenstreich [curfew]

WWII German field blouse button sewing and wool detail

A small sample of wartime enlisted issue tunics were examined to look at the button stitching and wool material, as part of an ongoing study of details of original uniforms. Previous articles in the series:

Wehrmacht Feldbluse Measurements
Internal Suspender Retaining Hooks
Small Buttons on the German Army Field Blouse

These photographs show original factory applied buttons. The thread used to apply the buttons is a thick button thread. The buttons appear to be hand sewn. The thread itself generally has a sheen that likely indicates linen content. The color varies, but is generally within the wide range of “Feldgrau.” Some of the thread may have shifted in color with time due to aging of the dyes. There are also variations in the stitching style, with some of them showing thread wrapped around the stitching, parallel to the wool surface; others lack this feature. All of these buttons are on dated garments, the year of manufacture of each field blouse is indicated in the photo.

The photos above also provide some details about the wool nap and weave. For comparative purposes, here are some photos of the wool used for garments dated in different years. The 1943 image only shows one garment, the other photos compare two different field blouses.

Strategies for promoting WWII reenacting using social media

WWII German reenacting needs a certain number of people worldwide for vendors to be willing to supply products that are mass-produced and economical, and for there to be enough people for there to be large events, and events at certain places. The more participants at an event, the more money an organizer (generally) has to make things happen. Those of us who are reenactors should all want to see the numbers in this hobby grow. Even if you view yourself as a super hardcore guy who scorns more laid-back units, the reality is that most reenactors start in mainstream type groups, and these guys are your pool of potential future recruits for the most part (not to say you should ever actively recruit from other units as this is “poaching” and very bad form). The bottom line is that there is no credible argument that less reenactors is better. The more people there are, the more people will be running events and finding event sites and doing the stuff people need to do for the infrastructure of this hobby to exist. A RISING TIDE FLOATS ALL BOATS.

The number of people involved in reenacting is always changing, it goes up and down. Some people are always going to leave due to moves and career changes, divorces or because they simply lose interest. That’s unavoidable. Recently the reenacting hobby has also had to deal with some additional external political pressure, that has certainly caused some people to leave reenacting. Reenactors should be proactive and do what we can to counteract this.

The best way to increase numbers is probably to beat the bushes and find new members for your unit in your local area. But that’s not the only way. It is my belief that it is possible to broadly promote WWII German reenacting as a hobby, via social media. In today’s world, this does entail some risk. Here are the strategies I have been using to do this. Have they worked? I can’t prove it, but I think so. I certainly don’t think it has hurt. I think if other reenactors would get on board and use the same or similar tactics it would be much more effective.

My strategy has two basic components:

1. Get great photos at events and share them as widely as possible.

 2. Be an ambassador for the hobby and a public face and point of contact on social media even if your real name and identity are concealed.

1. Photos
 

Part of the reason why I got into this hobby in 2000 was from one single photo that looked so good. This guy looks super real, and looks like he is having fun.

Look at reenactment photos you think are great. Figure out what you love about them and either take photos like that, or identify a guy in your group who can take the photos. When you are out on the battlefield, or inundated with spectators, you are not going to want to pull out a modern camera or phone. Maybe set aside some time before the event, after you are set up. Or after the public goes home. Or at the end of the event. It doesn’t have to take much time to make some great images. Ideally you want to get pictures that showcase not only your group, but the good things about the event site that make it unique and special. If you have a period camera, or if you are in a situation where it won’t destroy the setting if you pull out a digital camera, you can take some in-the-moment candid shots. Most wartime photos, though, were staged or at least posed in some way. A thought out photo is always going to be more impactful than unflattering candid shots of people eating (for example).

Once you’ve got the photos, comb through and select only the best ones. Never post a photo with some modern thing in it and caption it “Apologies for the modern vehicles” or whatever, this is embarrassing and may well end up being shared elsewhere without your explanatory caption. If you can’t crop the farb out, share it with your unit, but not with the world; images should stand on their own merits. Only post around 5 photos maximum on social media at a time. Social media is designed for instant gratification and short attention spans. Most people don’t want to scroll through two dozen pictures of your guys pointing rifles; if you post big sets of photos many people will be overwhelmed or lose interest and the impact is diminished. Sometimes you will only get 3 good pictures from an event. Other times you might get 30. In that case, you need to space out posting these. Post a small batch of around 5 photos each day. Separate them into unique batches that highlight a specific aspect you can talk about. Post the pictures on your reenacting-specific Facebook account if you have one (and you should). There are lots and lots of WWII reenacting and historical discussion groups on Facebook where you can post the photos. Don’t spam these groups, do one post only with a few of the very best photos and a description of the event. Maybe post in one group one day, and make a different post with other photos in a different group a day or two later. You never know where your photos are going to find the one guy on the other side of the world who is going to be so blown away he immediately jumps in with both feet. Your unit should also have a public Facebook page and also maybe a web site. You could also look around and find Internet forums with active memberships where you could post this stuff. Make sure your members are OK with having their photos shared. Some may not be, and that’s understandable. There are ways to show people where they are not going to be recognized. Use some creativity. It is always best if you can share any photos without revealing your actual name/identity.

I will often post event photos on social media in a very specific manner that I believe drives interest. As soon as I am set up at a reenactment event I will post one photo that shows some aspect of how we are set up, or where we are. This makes some people wish that they had attended that event or that they were going to some other reenactment at that time. Right after the event, on Sunday, I will post what I feel is the best digital picture that came out of that event. Then, over the next week, I will post the rest of the digital photos, and eventually the film photos, in small batches.

Instagram: You might want to have a personal reenacting Instagram account and one for your unit. I have come to regard Instagram as evil and insidious. Your phone has some way of figuring out what Google/Facebook/Instagram accounts you have and showing your various Instagram accounts to people you interact with elsewhere. A private Instagram account has no promotional value but a public one entails some risk if there is a chance there could be someone who will use this against you. On our unit Instagram we never show any close-up portraits or any photos in which anyone is easily identifiable at a glance. Lots of group shots, photos of the camp, photos taken from behind a marching column, etc.

Facebook or Instagram could delete any profile or group at any time, just for posting historical content related to WWII Germany. Back up stuff you want to keep.

2. Being a hobby ambassador on social media
 

You want to act as a cheerleader for the hobby, how ever and where ever you can. If you love an event, post on social media about how great it was. Go in the event group page and say what a good time you had. If it’s an annual event, when it is coming around again next year, post a highlight photo from the year before and talk about how great it was. You will be helping to promote the event. Event organizers appreciate this.

If an event sucks, don’t go back. Maybe some other people or groups like it, let them like it. Don’t disparage those events in an attempt to promote the events you do like. It’s a bad look.

Try to find spaces online that are open to reenactment discussion and post about your group. This is not just self-promotion. It promotes the hobby as a whole, everywhere.

Try to keep it professional and positive at all times. Don’t throw shit at other reenactors in public. Potential recruits could see this and get the wrong idea, it could turn them away. Nobody wants to wade into a morass of name-calling. Keep reenactment drama off the Internet at all times. Keep it private and go through the chain of command. Airing dirty laundry in public on social media is NEVER productive.

Find social media accounts for reenactment groups and follow them. Like their posts and comment on them. This makes them visible to a wider audience, it’s how the algorithms work. If you can’t say anything nice, just hold your tongue. But really, even with a total clown group, you should be able to find some little thing to appreciate.

Saying bad things about the hobby as a whole is not being a good ambassador. You want to talk it up and promote it. That’s not to say that you can’t go to a reenactor discussion group on Facebook and comment on stuff that is too heavily represented, or dispel myth and lore. That’s fine and good. But nobody wants to read about how reenactors are too old/fat/drunk/farby/real Nazis. If you feel like you need to vent, call a buddy from your group, or just back away from the computer for a bit and clean your rifle or something, until the urge passes.

Don’t post modern political stuff on reenactor accounts and ESPECIALLY don’t ever post anything that could be construed as “racist” by people trying to make you look bad. Even if it is an obvious joke (to you). They will hang you with this stuff. This makes us all look bad when they inevitably find you and make a stink about it.

At all times: share good information, lead by example, be the change you want to see in the hobby.
If you are not already a WWII German reenactor and you have read all this way, you should get started. It’s a ton of fun and you will make new friends and you won’t regret it.
WWII German straight entrenching tools and similar postwar and foreign variants

by Gregor Fleischer and Chris Pittman

Entrenching tools have been a general issue item for almost every army since the First World War. The German army of the Second World War was no exception. Pre-war the Wehrmacht adopted a flat blade, square head shovel with a short handle that could easily be carried by every soldier. This was essentially the same pattern as the shovels used by the German Army during WWI. This pattern of shovel was produced and used until the end of the war.

Up until 1938 the carrier for this pattern of shovel was made completely of leather. These carriers were made in both black and brown leather. Post-1938, the carriers were a mix of leather and a pressed paper product known as Presstoff or Ersatzleder. These leather/Presstoff carriers came in a variety of mixed shades. Often, these carriers were produced with leather belt loops and closure strap. The body of the carrier would be Presstoff. The leather fittings could be brown or black. The presstoff could be black, tan, or a blue/grey color.

Around 1940 a more modern entrenching tool known as the Klappspaten, or folding spade. The Klappspaten had the ability to be used as a traditional spade or a mattock. This allowed for easier digging with such a small shovel. The Klappspaten and flat blade spade served side by side in the Wehrmacht until 1945. The carrier for this pattern of shovel was produced in both leather and Presstoff.

 
The following photos illustrate differences between original WWII German shovels and similar looking foreign made shovels that are sometimes confused for Wehrmacht issue.
 

In the above photo, the example at far left is a German made one from 1934. It features a riveted blade and riveted “ears” at the top of the blade.

Second from left is the standard Wehrmacht type that appeared before the war. This example is dated 1945. It features a welded blade and folded over “ears.” Some shovels in this pattern were also made with a riveted blade.

At center is a Swiss shovel. The “ears” at the top of the blade are curved and bent but not folded over as with the Wehrmacht type. This shovel is almost identical to the WWI French type.

Second from right is a postwar Dutch shovel. With its folded over “ears” and welded blade, it is nearly identical to Wehrmacht issue.

At far right is a postwar East German army shovel. The “ears” are slight and the blade is neatly welded with no flange. There were other East German models including a riveted type.

The most immediately noticeable diagnostic difference among these various shovel types is the top of the blade. The following pictures show the different forms and indicate the origin of each. Some forms were used by different armies at different times and this may not be a comprehensive list as it does not take into account less commonly encountered types or manufacturer variations.


Wehrmacht unit structure, assigned weapons and vehicles according to K.St.N.

Every type of wartime Wehrmacht unit was organized according to specific guidelines that were laid out in a special chart. The chart laid out exactly how many men were to be assigned to the unit type, what their roles would be, what ranks these soldiers were to hold, and what weapon each was to carry. The chart also specified exactly what kinds of vehicles each unit type was to be equipped with. This chart was called the K.St.N., an abbreviation for Kriegsstärkenachweisung – War Strength Certificate.

Weapons were assigned to soldiers based on their roles, not their ranks. The issued weapon did not become the personal property of the soldier; it was owned by the German Reich, and units had to hold soldiers accountable for the weapons issued to them. To identify what sort of weapon was issued to a soldier, one need only look at the K.St.N. chart for the corresponding unit type.

As of this writing, there are some great resources online for looking up the K.St.N. charts. One of these is Christoph Awender’s WWII Day by Day, which contains many of the K.St.N. charts neatly laid out in a way that makes it easy to visualize the manpower and equipment of each unit type. Sturmpanzer.com has a download section that allows one to download lots of K.St.N. as scans of the original wartime German documents.

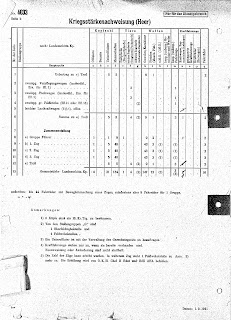
To illustrate the information contained in the K.St.N., let’s look at the original German K.St.N. number 4033, for a Landesschützen-Kompanie stationed in the occupied Western territories. The K.St.N charts were changed and updated until the end of the war, so it is important to note the date; this one is dated February 1, 1941.

From this document we can see that a Landesschützen-Kompanie in the West was to be commanded by an officer, armed with a pistol or machine pistol, and assigned a horse for his use (later this was removed). To the commander was attached a Kompanietrupp consisting of a Hauptfeldwebel armed with a pistol or machine pistol, 5 enlisted messengers on bicycles armed with rifles, 2 enlisted clerks armed with rifles, an enlisted caretaker for the horse armed with a rifle, and one car, with an enlisted driver armed with a rifle.

Within the Landesschützen-Kompanie were 4 Züge (platoons). Each Zug had an officer, armed with a pistol or machine pistol and assigned a bicycle, as a platoon leader. To this leader was attached a Zugtrupp consisting of an NCO armed with a rifle, and 4 enlisted messengers armed with rifles, of which two were on bicycles, and one was equipped with a signal horn.

Each Zug had 4 Gruppen (squads). Each Gruppe was led by an NCO, armed with a rifle. One Gruppe had a light machine gun, and a cart to go with it. The MG gunner and his assistant (enlisted men) were armed with pistols. This Gruppe also had 7 enlisted men armed with rifles. The other 3 Gruppen simply had 9 enlisted riflemen.

The unit also had a Tross, which was the logistical and administrative part of the Kompanie. The Tross had 5 NCOs, armed with pistols or machine pistols, each with his own specific duties. Two of these NCOs had bicycles. The Tross also had 5 enlisted men armed with rifles: three horse drivers, a cook, and a vehicle driver. The Tross had two carts with two horses each- one for rations, and one for baggage. It also had a field kitchen, with two horses to tow it, and a light open truck.

This K.St.N was different from the K.St.N for a Landesschützen-Kompanie in the Ost, which had 4 machine guns per Zug. It was also different from the K.St.N. for a Landesschützen unit located within Germany.

Wehrmacht Feldbluse measurements

Seven original unaltered wartime enlisted issue tunics were examined and measured to look at similarities and differences in the cut and tailoring.

Some aspects of the cut of each garment appear to be constant. The rear skirt is always shorter than the front skirt, between 1 inch and 2.5 inches shorter. The waist measurement across the front is always smaller than the armpit-to-armpit measurement, though this difference is small as .75″ and as big as 2.5″.

Other measurements vary widely from one example to the next. This should be no surprise. These garments were not sized as small, medium and large. Each garment was sized five different ways: the length of the tunic back, the collar size, the chest size, the overall length, and the sleeve length. These numbers varied independently of each other, as we can see looking at the original marked sizes on these examples. There is no direct correlation between the various sizes; a tunic could have a larger chest size but a shorter overall length. There is also no readily observable correlation between sleeve length and overall length. Two of the garments are stamped with a height range indicating they were suited for people who were 171-175 cm tall. These garments have different stamped sleeve lengths.

Some of the variation is surprising. Variation in pocket size and shape is remarkable. The proportions are not consistent. Some lower pockets are wider than they are tall. On others, it is the opposite. Futhermore, the measurement from shoulder to shoulder seems to vary in a way that does not correlate with chest size. I do not believe that wear and stretching or shrinkage could account for all of these variations. I believe that they were different when made, and that some of these differences are either unintentional, or were manufacturer variations.

Here are the numbers for each garment. Measurements were rounded to the nearest quarter inch. The numbering is arbitrary and doesn’t correspond to the photo. I have included the original stamped sizes for reference only. The sleeve length was measured on the M43 models only. Both of the worn M40 tunics had repairs to the sleeve ends that might have altered the original length.

Field blouse #1
Model: M40
Stamped tunic back length: 41 cm
Stamped collar size: 40 cm
Stamped chest size: 90 cm
Stamped overall length: 88 cm
Stamped sleeve length: 61 cm
Stamped height range: none
Measured shoulder width (seam to seam at the top): 16.75″
Measured arm hole height (top of shoulder to armpit): 8″
Measured armpit-to-armpit: 19.5″
Measured waist (across the front at the lowest belt hook hole): 18.75″
Measured chest pockets: 5″ wide, 6.25″ high
Measured lower pockets: 8.5″ wide, 8″ high
Measured sleeve length: N/A (repaired)
Measured front length (top of shoulder at collar to skirt end): 27″
Measured back length (base of collar to skirt end): 25.25″

Field blouse #2
Model: M40
Stamped tunic back length: 41 cm
Stamped collar size: 41 cm
Stamped chest size: 90 cm
Stamped overall length: 68 cm
Stamped sleeve length: 61 cm
Stamped height range: none
Measured shoulder width: 16″
Measured arm hole height: 9″
Measured armpit-to-armpit: 19″
Measured waist: 17.5″
Measured chest pockets: 5″ wide, 6.75″ high
Measured lower pockets: 8.75″ wide, 8.25″ high
Measured sleeve length: N/A (repaired)
Measured front length: 27.5″
Measured back length: 26.25″

Field blouse #3
Model: M43
Stamped tunic back length: 43 cm
Stamped collar size: 62 cm
Stamped chest size: 104 cm
Stamped overall length: 72 cm
Stamped sleeve length: 45 cm
Stamped height range: none
Measured shoulder width: 18″
Measured arm hole height: 9.5″
Measured armpit-to-armpit: 22″
Measured waist: 20.5″
Measured chest pockets: 5″ wide, 6.25″ high
Measured lower pockets: 7.75″ wide, 8″ high
Measured sleeve length: 23″
Measured front length: 27.5″
Measured back length: 26.25″

Field blouse #4
Model: M43
Stamped tunic back length: 43 cm
Stamped collar size: 43 cm
Stamped chest size: 96 cm
Stamped overall length: 72 cm
Stamped sleeve length: 62 cm
Stamped height range: 171-175 cm
Measured shoulder width: 16.5″
Measured arm hole height: 9″
Measured armpit-to-armpit: 21″
Measured waist: 18.5″
Measured chest pockets: 5.25″ wide, 7″ high
Measured lower pockets: 8.25″ wide, 8.75″ high
Measured sleeve length: 24″
Measured front length: 29″
Measured back length: 28″

Field blouse #5
Model: M43
Stamped tunic back length: 43 cm
Stamped collar size: 40 cm
Stamped chest size: 88 cm
Stamped overall length: illegible
Stamped sleeve length: 64 cm
Stamped height range: none
Measured shoulder width: 14.75″
Measured arm hole height: 9″
Measured armpit-to-armpit: 18″
Measured waist: 16″
Measured chest pockets: 5″ wide, 7.5″ high
Measured lower pockets: 8.25″ wide, 8″ high
Measured sleeve length: 25.5″
Measured front length: 29″
Measured back length: 28″

Field blouse #6
Model: M43
Stamped tunic back length: 43 cm
Stamped collar size: 42 cm
Stamped chest size: 92 cm
Stamped overall length: 72 cm
Stamped sleeve length: 64 cm
Stamped height range: none
Measured shoulder width: 16.5″
Measured arm hole height: 9.25″
Measured armpit-to-armpit: 19″
Measured waist: 17.25″
Measured chest pockets: 5.25″ wide, 7.25″ high
Measured lower pockets: 9.5″ wide, 9″ high
Measured sleeve length: 25.5″
Measured front length: 30″
Measured back length: 27.5″

Field blouse #7
Model: M43
Stamped tunic back length: 43 cm
Stamped collar size: 40 cm
Stamped chest size: 88 cm
Stamped overall length: 72 cm
Stamped sleeve length: 64 cm
Stamped height range: 171-175 cm
Measured shoulder width: 15″
Measured arm hole height: 9.5″
Measured armpit-to-armpit: 17.25″
Measured waist: 16.5″
Measured chest pockets: 5.25″ wide, 7.5″ high
Measured lower pockets: 8″ wide, 8.75″ high
Measured sleeve length: 25″
Measured front length: 29.25″
Measured back length: 28.25″

Wehrpass of a Gefreiter in Sicherungs-Regiment 107

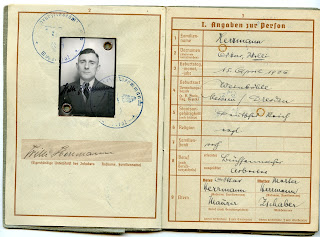
Willi Hermann was born near Dresden in 1906. He worked for a textile company. In 1939, he was given a military physical, deemed to be fit for duty and assigned to the “Ersatzreserve I” category, which included males under the age of 35 with no military training. He was drafted in 1941, at the age of 35, and after barely more than one month of training, he was assigned to Landesschützen-Bataillon 464. Initially, he was trained on how to use the Gewehr 24 (t) and MG 26 (t), these were the German designations for the Czech VZ24 rifle and ZB26 machine gun. It’s probable that Hermann was trained on the use of these Czech weapons because he trained to serve in rear area type units that would have been armed, at least in part, with obsolete and captured weapons. On November 5, 1941, Hermann was transferred, and assigned to a Marschbataillon, a unit for soldiers in transit. Almost 3 weeks later, he officially joined his new unit: Landesschützen-Bataillon (later Sicherungs-Bataillon) 869, at that time active in Russia in Army Group North and attached to the 281. Sicherungs-Division. He served with this unit for 11 months, during which time he participated in security duties and also fights against partisans. For his service with this unit in Russia in the winter of 1941/1942, he was awarded the “Ostmedaille” campaign decoration. In August of 1942, after serving in the Wehrmacht for more than 14 months, Hermann was promoted to the rank of Gefreiter. On October 15, 1942, the Sicherungs-Bataillon of which Hermann was a part, was redesignated, and became the I. Bataillon of Sicherungs-Regiment 107.

On November 12, 1942, strong partisan bands emerged in the area 28 kilometers southeast of Salkowitschi*. Hermann’s unit, 4. Kompanie, Sicherungs-Regiment 107, was at that time based in this area, in the locality of Machnowka. The next day, November 13, Hermann’s unit made contact with a strong partisan band in the area of Chulpowo, 10 kilometers north-northeast of Machnowka. By November 15, the operation was over. In this combat, 4./Sich. Rgt. 107 suffered 3 men wounded, and one officer, 3 NCOs, and 10 enlisted men killed- among them, Willi Hermann. The officer killed in that action, was the man who had certified the promotion entry in Hermann’s Wehrpass. The Wehrpass records that Willi Hermann died in a place called Ssiwkowo, and was buried in Ostrow. He was 36 years old.

Willi Hermann was mourned by his wife, his mother, and the two children he left behind. He was one of 3.4 million German soldiers killed in WWII.

*I have retained the German spelling for all place names.

Photo and personal details of Willi Hermann

List of the units Hermann served with in WWII.
Weapons trained on: Gewehr 24(t), l. MG 26(t), and later, the K98 rifle.
Page 22 records Hermann’s rank promotion. It is signed by Leutnant Grüssinger, who was killed in the same action as Hermann. Page 23 records the award of the “Winterschlacht im Osten” medal.
List of all the campaigns Hermann was a part of. From November 11, 1941, through December 31, 1941: Securing the operational area and fights against partisans, with Army Group North. January 1, 1942, through November 13, 1942: Action against the Soviet Union.
This entry records the details of when and where Hermann was killed, and where he was buried.

Archive document: Waffenfarbe color and shoulder board insignia for all German Army units, 1944

The German military uses insignia piped in different colors (known as Waffenfarbe) to distinguish different service branches. In WWII, the Wehrmacht used shoulder board insignia as the only distinguishing unit insignia for most units. This original 1944 German document from the US National Archives indicates the correct Waffenfarbe and shoulder board insignia for every type of unit in the German Feldheer.

“Übersicht der Truppenkennzeichen des Feldheeres”

Talking to the Media: Suggestions for WWII German Reenactors

You need to proceed from the assumption that they are going to call you a Nazi.

Over the years, I have done very many interviews for television news broadcasts and other TV programs, newspapers and other print publications, and radio broadcasts. With regard to reenacting specifically, I have been quoted in a number of newspaper and magazine articles. In 2011, I participated in a WWII reenactment at which another reenactor was badly injured, after which I was interviewed for the local CBS television news broadcast- an interview later quoted in national and international news coverage of the accident. The purpose of this post is to share my perspective and to make suggestions based on my experience. I am not a professional in public relations and do not claim to be an expert, but I have noticed, over time, some clear patterns with regard to media coverage, favorable or unfavorable.

Why talk to the media at all? It’s a valid question. Especially in our current political climate in the USA, news reports about WWII reenacting have a better-than-even chance of being negatively slanted. A case can certainly be made that at this point, the less the average man on the street knows about reenacting, the better. My personal opinion is that there are several potential benefits to carefully considered interactions with journalists. Even decidedly negative news coverage may kindle an interest in someone who might otherwise never have considered reenacting. But either way, in the final analysis, refusing to speak to reporters won’t stop them from writing and broadcasting about reenacting. The following tips have served me very well in interactions with reporters.

-Reporters are looking for sound bites. Before the reporter talks to you, they probably already know what their piece is going to look or sound like. They probably already have a fairly solid idea of the exact sound bite or brief quote they want you to provide. Try to speak in short sentences and answer their questions in as concise a way as possible, they will appreciate this and there is also less of a chance for them to get you to say something they can take out of context. Don’t be afraid to repeat your talking points using different wording. You want to give them sound bites that put a positive spin on living history but more importantly, you want to deny them any negative or damaging quotes they may be looking for.

-Reporters will lie. Don’t believe that they are writing a positive piece that will make you look cool, even if they give you every assurance. Definitely do not ever make candid, “off the record” remarks. In every interaction with them, keep your guard up.

-Do your homework. If you are contacted by a journalist, look at their other work, look at the publications or broadcasts they work for. If they work for a news source that leans toward clickbait articles or lurid headlines, there is every reason to assume they will negatively sensationalize you however they can. You are probably better off not working with such an outlet. And regardless of your personal political leanings, news organizations that have a “progressive” slant should be regarded with a maximum of caution. Any news coverage by such a source is likely to be negative.

-Use a fake name. You can’t know how the reporter might twist your words. You might even find that the article uses your photo, but the only reenactor quoted in the text is some ignoramus making statements you want nothing to do with. A lot of news content goes online and could be there forever. You don’t want potential employers or others finding your name in a hit piece about Nazis, if they do a Google search. Don’t give your impression name, it’s too obvious. Just pick a regular, typical, common and believable name. They won’t ask for your ID. They just need someone to provide the sound bites they need.

-Keep it mundane. You don’t want to get caught up in flowery language about higher purposes of reenacting. They can make you look stupid by juxtaposing your words with professional educators and historians, or members of other groups who will contradict you. Try to keep it fact-based and basic. Don’t claim to be an educator if that’s not your profession. You can talk about how reenacting is educational for participants, you can point out that reenactors work with accredited and legitimate historical sites and provide visual props for historic sites. Try to speak in broad terms.

-Don’t get involved in moral judgments or posturing. Wehrmacht soldiers were men of their time. Do not praise them, do not condemn them. Avoid using words like “bad guys” or “evil.” You want to stay morally neutral. Definitely do not ever bring up Allied war crimes or make any kind of better/worse comparison, you cannot win with this. If the journalist specifically asks about Allied war crimes, try to find a way out of giving any usable answer. You need to be acutely aware of possible attempts to make you look like a revisionist or denier. If the reporter brings up the Holocaust you have to give some kind of very basic response. “The crimes and wartime atrocities of the Nazi regime are well-documented. The enormity of the human tragedy is one of the reasons why it is so important to commemorate and to remember this period of history.”

-Don’t do politics at all. None. You are an amateur historian and not a politician. You cannot overstate this. Simply refuse to answer any questions about modern politics. Keep the names of modern politicians out of your mouth completely.

-Don’t tokenize people. Do not point out that people in your group, or in your life, are ethnic minorities, or Jewish, or gay, to demonstrate that you are not a racist or bigot. It has the opposite effect. Don’t ever do this. But ESPECIALLY don’t do this talking to a reporter.

-Don’t conflate reenacting with actual WWII service. Never say “we” or “us” when talking about WWII soldiers.

-If you are out in public as a reenactor, you are a public figure. It’s OK to politely decline to speak to a reporter. But if you are going to freak out and hide your face if a reporter is shooting photos or video, you really should not be going to public events. If you are doing something where spectators are there to see you, the potential of being on the news exists. Participating in a public event is a choice that you make. Acting rude or indignant towards reporters makes us look bad.

-Look at the big picture. You are making statements not only for yourself, or as a representative of your unit, but on behalf of all of reenacting. Keep it professional, but try to talk up our hobby and be a cheerleader for it in whatever small way you can. Definitely don’t disparage reenacting in any way. And don’t be afraid to say it is fun.

-Trust your gut. If you don’t feel confident, walk away. Leave it for someone else.